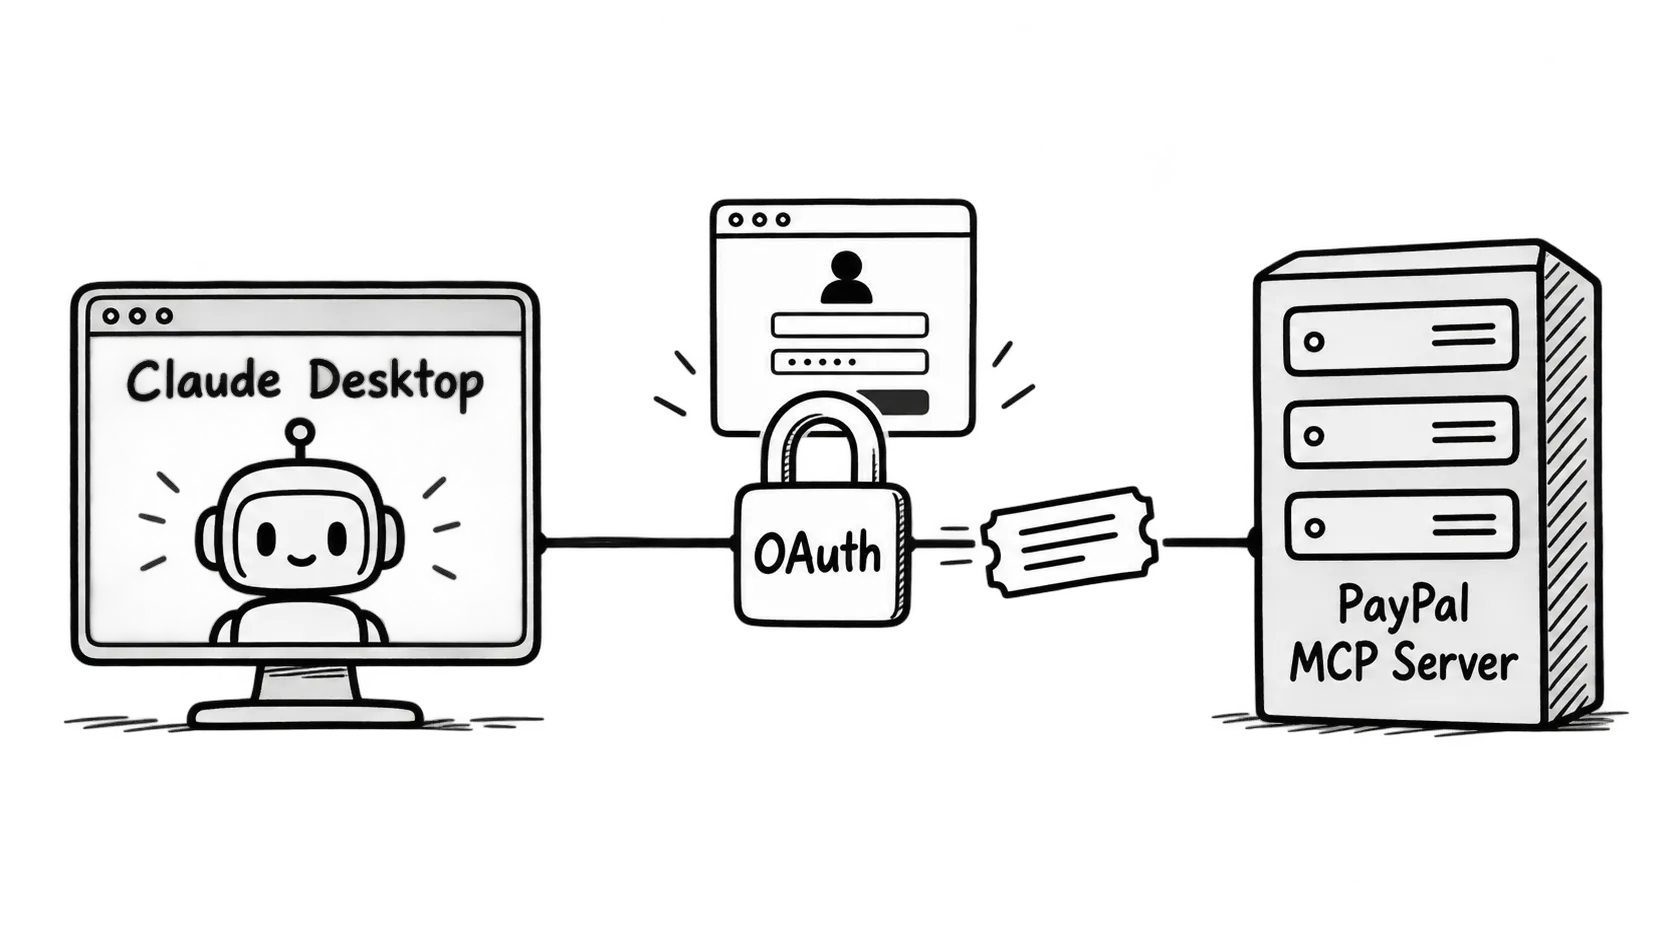
In the previous post, we walked through the GitHub MCP server using STDIO transport which keeps things local and sidesteps most security concerns. This post takes the next step: connecting Claude Desktop to PayPal’s remote MCP server, which runs over HTTP and requires real authorization handling.
That shift from local to remote is where MCP security gets interesting. And PayPal, a platform handling real accounts, real transactions, and real money is exactly the right example to learn it from.
I’ll extend the same layered approach from the previous post: start with what the user experiences, then gradually unwrap what’s happening underneath. If you haven’t read the GitHub MCP walkthrough yet, I’d recommend starting there before diving into this one.
This post is based on the 2025-03-26 revision of the MCP protocol and authorization spec changes introduced on 2025-04-26. Details may change in future revisions. (Published: 12 May 2025)
This post focuses specifically on PayPal’s remote MCP server, hosted on PayPal’s infrastructure and communicating over HTTP/SSE. For context, PayPal also offers a local MCP server that behaves similarly to the GitHub server from the previous post.
Unwrapping MCP: A Walkthrough with the GitHub MCP Server MCP explained from the inside out, starting with a real developer workflow then unwrapping the protocol layer by layer: roles, messages, connection lifecycle, and STDIO transportThe experience
To get started, I added the configuration snippet from PayPal’s MCP documentation into Claude Desktop’s settings file and restarted the application.
On launch, Claude Desktop automatically opened a browser window, which redirected me to PayPal’s login page. After completing the login flow, I was redirected back to Claude Desktop — where a new interface element appeared confirming a successful connection to the PayPal MCP server. Clicking that element showed the tools exposed by the server, confirming that Claude Desktop had established a session tied to my PayPal account.

With the setup complete, I sent a simple query:
How do you compare my expenses during last February and this February using PayPal?
Claude Desktop, with the help of the LLM, identified the appropriate tool listTransactions from the PayPal MCP server and prompted me for consent before executing it. Same pattern as VS Code in the previous walkthrough.

After I granted consent, the tool was executed and the results came back as a well-structured natural language summary comparing my expenses across the two months.

This is what a remote MCP server looks like from the user’s perspective seamless, conversational, and operating across real financial data. Now let’s look at what actually happened under the hood.
The security flow
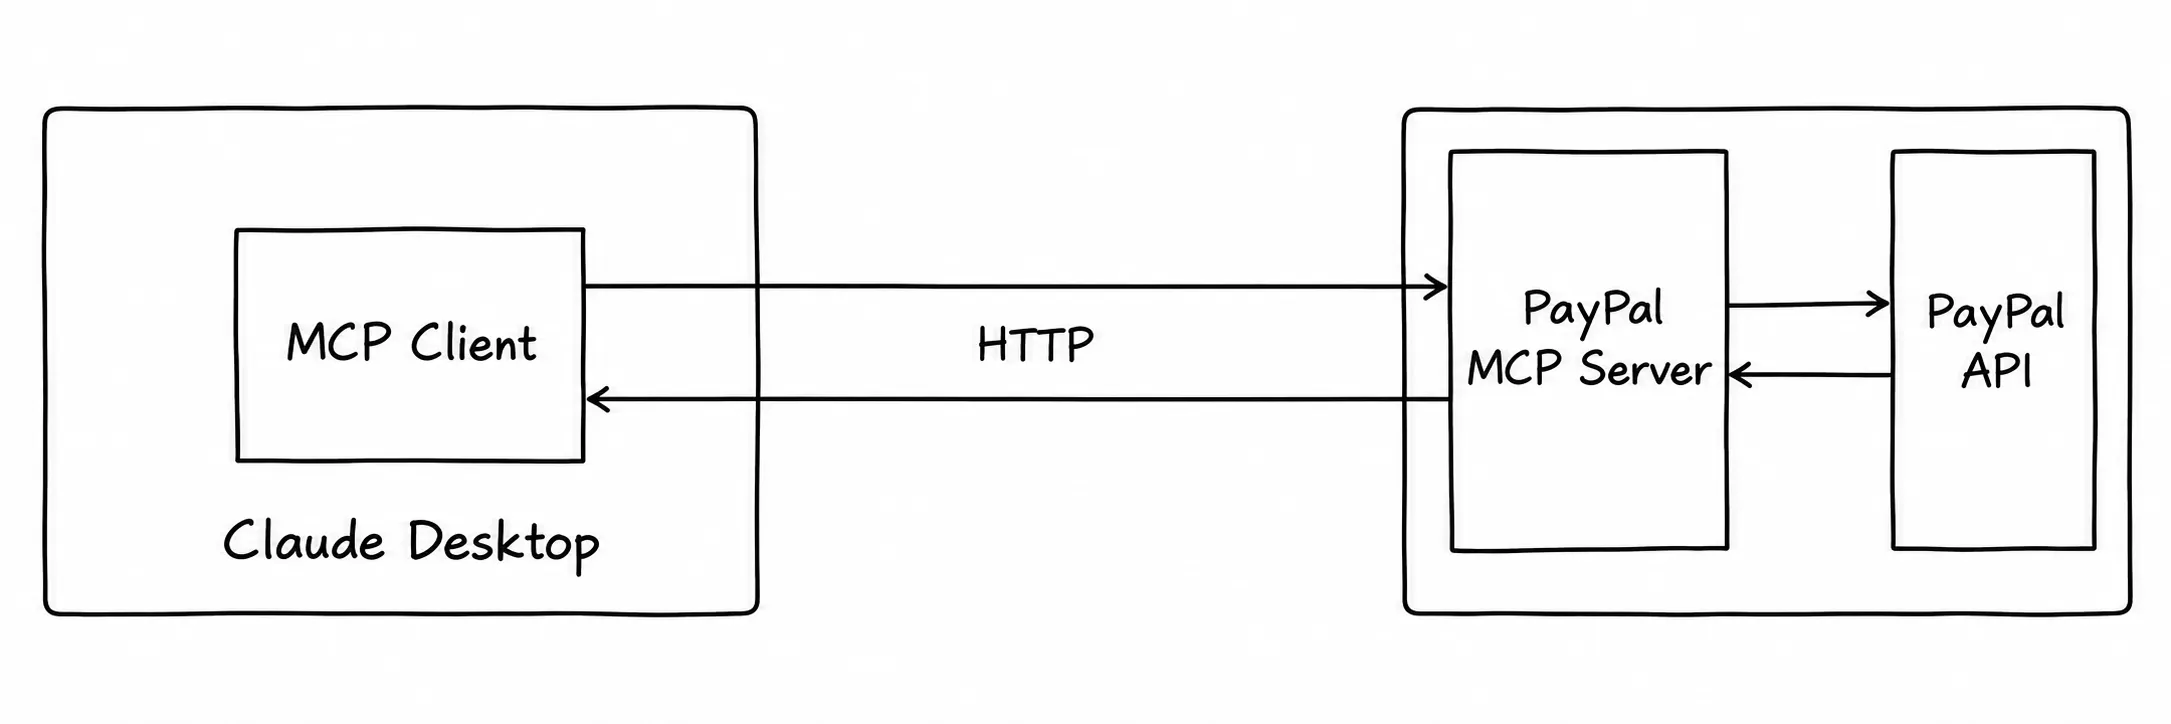
Let’s start by understanding how each component connects. Claude Desktop runs locally on your machine. It’s configured to connect to the PayPal remote MCP server, which is hosted on PayPal’s infrastructure. The PayPal MCP server in turn connects to PayPal’s backend APIs.
Claude Desktop communicates with the PayPal MCP server over HTTP which means two things: the connection uses TLS (HTTPS) for transport security, and the HTTP endpoint requires application-level security on top of that. This requirement is fundamentally not different from how we secure any API endpoint. The MCP host, Claude Desktop in our case — handles most of this complexity behind the scenes and only surfaces interactions that require the end user.
In this section, let’s unwrap that security layer using Postman so we can observe exactly what’s happening.
Step 1: What happens without a token
As a first exercise, let’s assume there are no security requirements and make a direct call to the PayPal MCP server endpoint. You can find the MCP endpoint URL in the Claude Desktop configuration file.
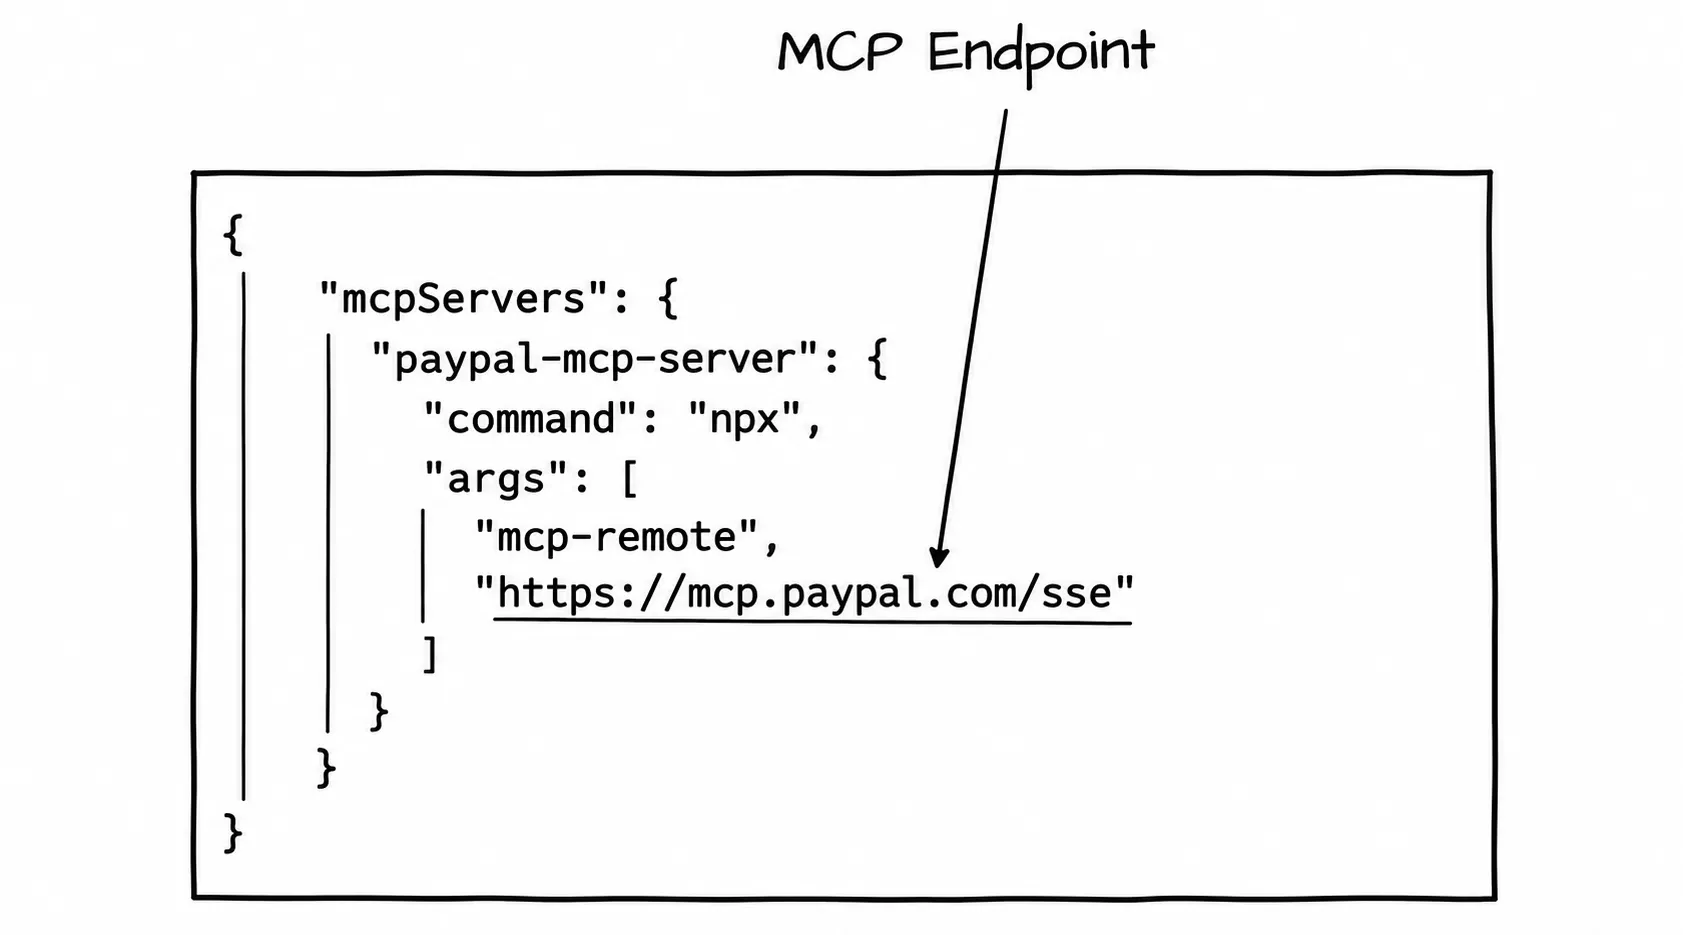
Send an HTTP request to that endpoint using Postman or cURL — without any authorization header.

The response is an HTTP 401 Unauthorized stating that either no access token was provided, or the one provided is invalid. In our case, we know no token was provided.
So we need an access token from PayPal before any MCP messages will go through. Now you might be wondering: Claude Desktop figured this out and obtained a valid token without any manual setup, how?
Step 2: Metadata discovery
This section is based on the 2025–03–26 revision of the MCP protocol and changes introduced to the auth spec on 2025–04–26. Details may change in future revisions of the MCP protocol. (Date — 12/05/2025)
This is where the MCP specification’s metadata discovery mechanism comes in. Section 2.3.2 of the MCP Authorization spec explains how an MCP client determines the server metadata endpoint — the URL that describes everything needed to obtain an access token. Claude Desktop uses the following procedure to construct it:
Take the MCP server URL and discard any path components to get the base URL Append /.well-known/oauth-authorization-server to construct the metadata endpoint, as defined by the OAuth 2.0 Authorization Server Metadata specification (RFC 8414)
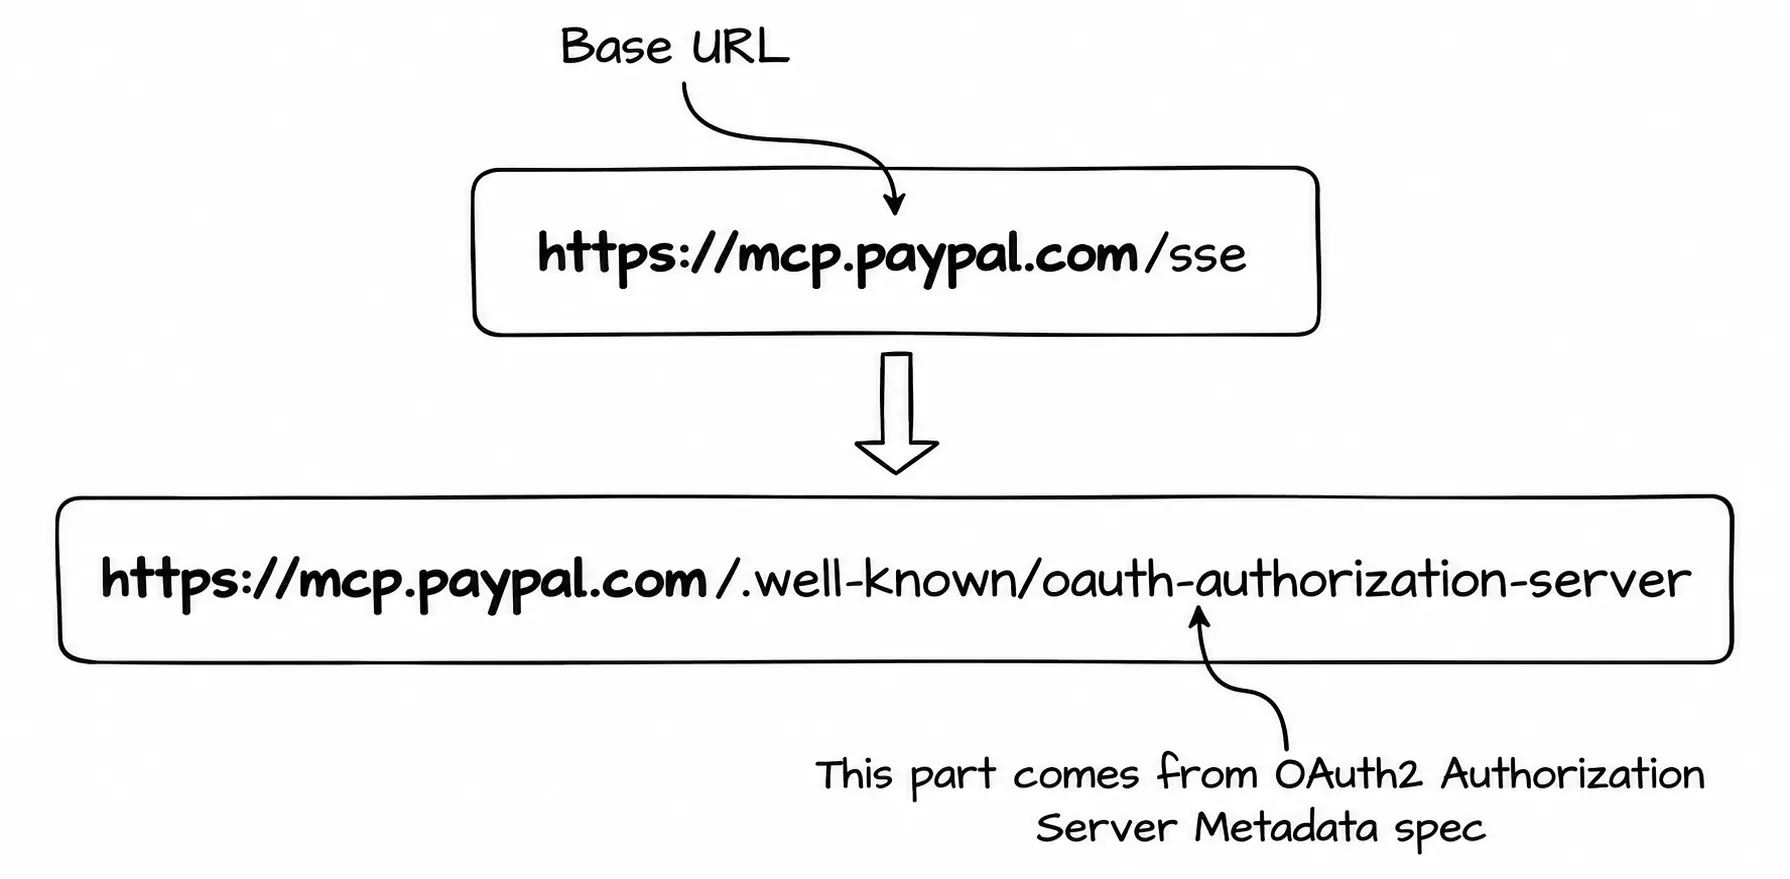
With that endpoint in hand, send a GET request to it using Postman.

The response is the server metadata document. From this, you can read off everything needed for the next steps:
- Client registration endpoint — OAuth 2.0 requires clients to register and obtain credentials before requesting tokens
- Authorization endpoint — where Claude Desktop sends the user for authentication and consent
- Token endpoint — where Claude Desktop exchanges the authorization code for an access token
The document also includes supported grant types, client types, and client authentication methods. As per the MCP specification, MCP servers should and MCP clients must support the OAuth 2.0 Authorization Server Metadata specification.
When a server doesn’t support Authorization Server Metadata, the MCP spec defines a fallback mechanism for determining the required endpoints.
A note on how this is changing in future revisions
Shortly after the 2025-03-26 revision, significant discussions emerged around the authorization spec design. It’s worth pausing on this, because the change reflects an important architectural shift. In the current revision, all authorization capabilities returning AS metadata, dynamic client registration, authorization, and token endpoints — are defined as part of the MCP server role. In other words, authorization is tightly coupled with the MCP server itself.
OAuth 2.0 takes a different approach: it defines the Authorization Server (AS) and the Resource Server (RS) as two distinct roles. The spec allows a single entity to play both roles, but keeping them separate gives implementers meaningful flexibility, particularly in enterprise environments where authorization infrastructure already exists independently of the services it protects.
Mapping OAuth 2.0 terminology to MCP: the tools, prompts, and resources exposed by an MCP server map to the Resource Server role, while the authorization capabilities map to the Authorization Server role. The current design conflates them, which limits flexibility and creates unnecessary coupling.
The tightly-coupled design was likely a pragmatic choice, it allows metadata discovery to work from the MCP server URL alone, with no additional configuration. But based on feedback from identity experts and implementers, this is being reconsidered.
The draft specification has moved to use the OAuth 2.0 Protected Resource Metadata (PRM) specification (RFC 9728) for metadata discovery instead. PRM defines a standard mechanism for a Resource Server to return a pointer to its metadata as part of the initial 401 response. Future revisions of the MCP specification will require both servers and clients to support PRM. I’ve written a dedicated post on how PRM works and why it matters.
Protected Resource Metadata Is the Missing Piece in OAuth 2.0 Discovery OAuth 2.0 could automate client registration and AS discovery, but clients still had to hardcode which authorization server protects a given resource. Protected Resource Metadata fixes that. Here's how PRM completes the dynamic integration storyStep 3: Client registration
With the metadata document in hand, we can register an OAuth 2.0 client application by sending a request to the registration endpoint, as defined by the OAuth 2.0 Dynamic Client Registration protocol (RFC 7591).

In the example above, we registered a confidential client and received client_id and client_secret in response. I’ve covered DCR in more detail in a previous post.
Let’s quickly recap where we are:
- We derived the metadata endpoint from the MCP server URL — the only URL we had to start with
- We discovered the registration, authorization, and token endpoints from the server metadata
- We registered an OAuth 2.0 client and received the necessary credentials
One important point: you typically only need to do this once per MCP server — when first adding it to your host application. Once registration is complete and metadata is retrieved, the host application can persist these securely for use in future token requests.
Two additional things worth noting at this stage:
- Depending on whether your client application can securely store and manage client secrets, you need to choose between a public client and a confidential client.
- The MCP specification uses OAuth 2.1 draft, not OAuth 2.0 — which means regardless of client type, you must use PKCE. I’ve covered PKCE in detail here.
Step 4: Authorization code flow
Now let’s run the actual OAuth 2.0 authorization code flow. For this walkthrough, I’m using Postman’s built-in OAuth 2.0 configuration — filling in the authorization and token endpoints from the server metadata, and the client_id, client_secret, grant type, and redirect URI from the DCR response.

When you press Get Access Token, Postman constructs an authorization request and opens it in a browser. If everything is configured correctly, you’ll see the PayPal login screen — no different from a standard login flow.

Once the user logs in and consents to share the token, PayPal returns an authorization code to the client via the browser. The client then exchanges this code at the token endpoint to obtain an access token.

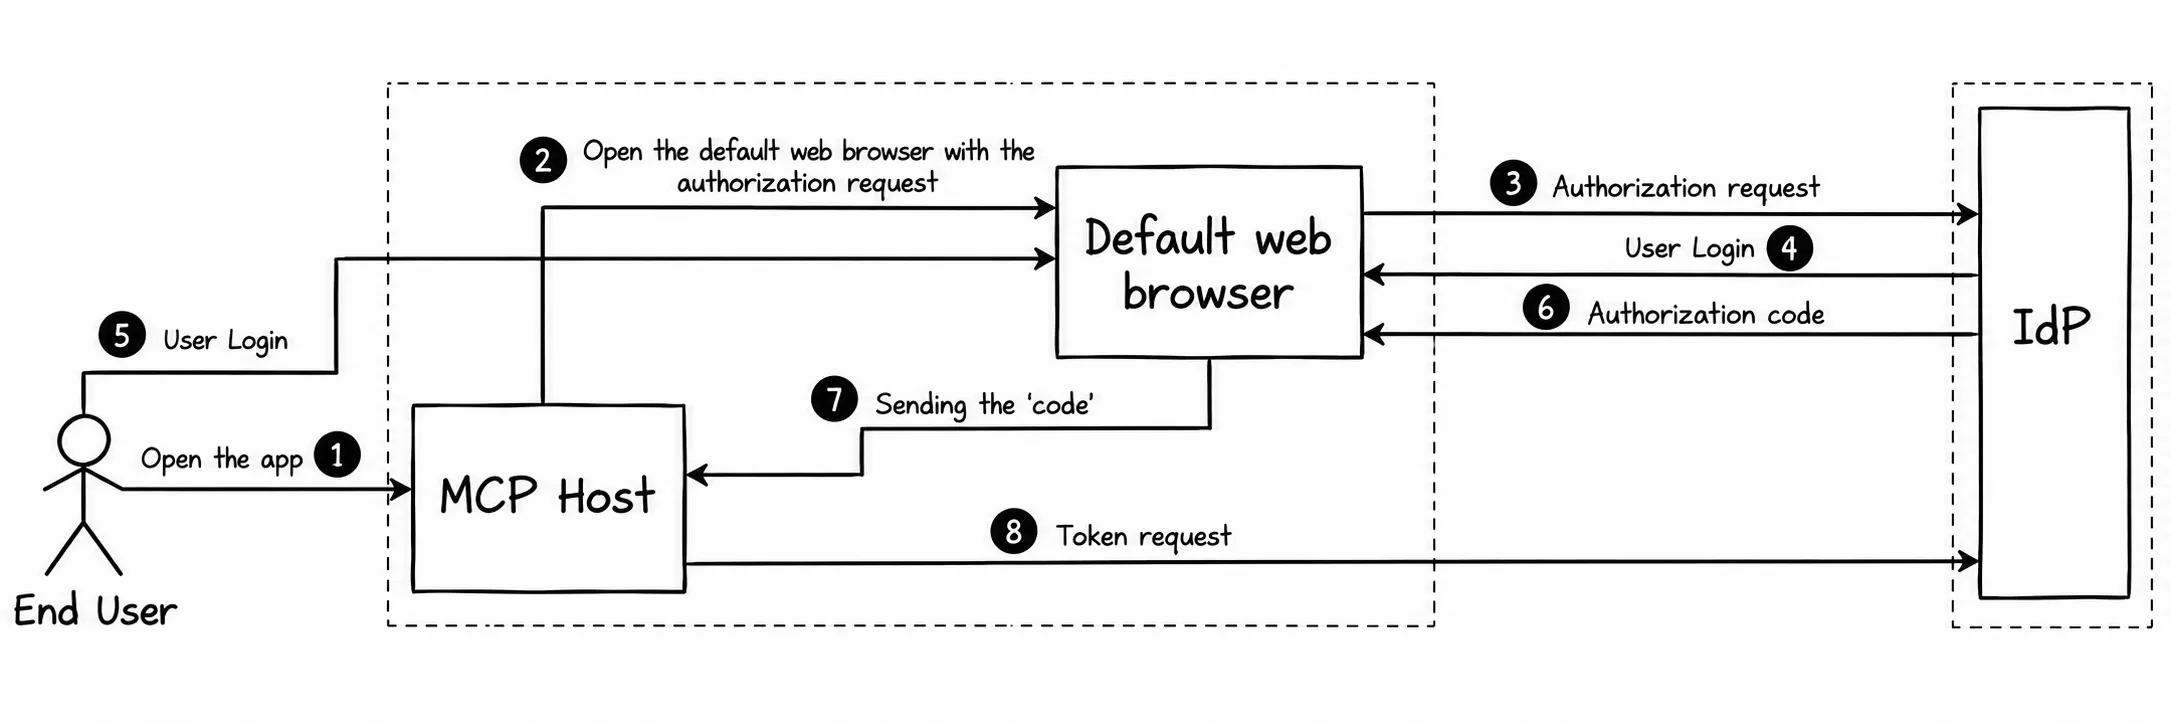
In this walkthrough we used Postman’s embedded browser — but in a real application, the flow works differently. Here’s how a real-world implementation handles it:
-
During registration, the application registers either a custom URL scheme (e.g. appname://auth/callback) with the OS, or a port on a temporary local web server (e.g. http://localhost:3000/auth/callback) that it starts before the authorization flow begins.
-
The application constructs the authorization request and opens the system’s default browser programmatically — on macOS and Windows, using system calls like open or start.
-
The browser sends the authorization request. The server validates it and returns the login page.
-
After authentication and consent, the server redirects the user back to the registered redirect URI with the authorization code. If a custom URL scheme is used, the browser detects it and opens the registered application.
-
The application processes the code, constructs a token request, and sends it to the token endpoint.
-
The application receives and stores the access token.
Step 5: Connecting with the token
With the access token in hand, we can now send the original MCP message — this time with the token attached. The client connects to the MCP server and a session is established.
 [Screenshot: Successful MCP session with token]
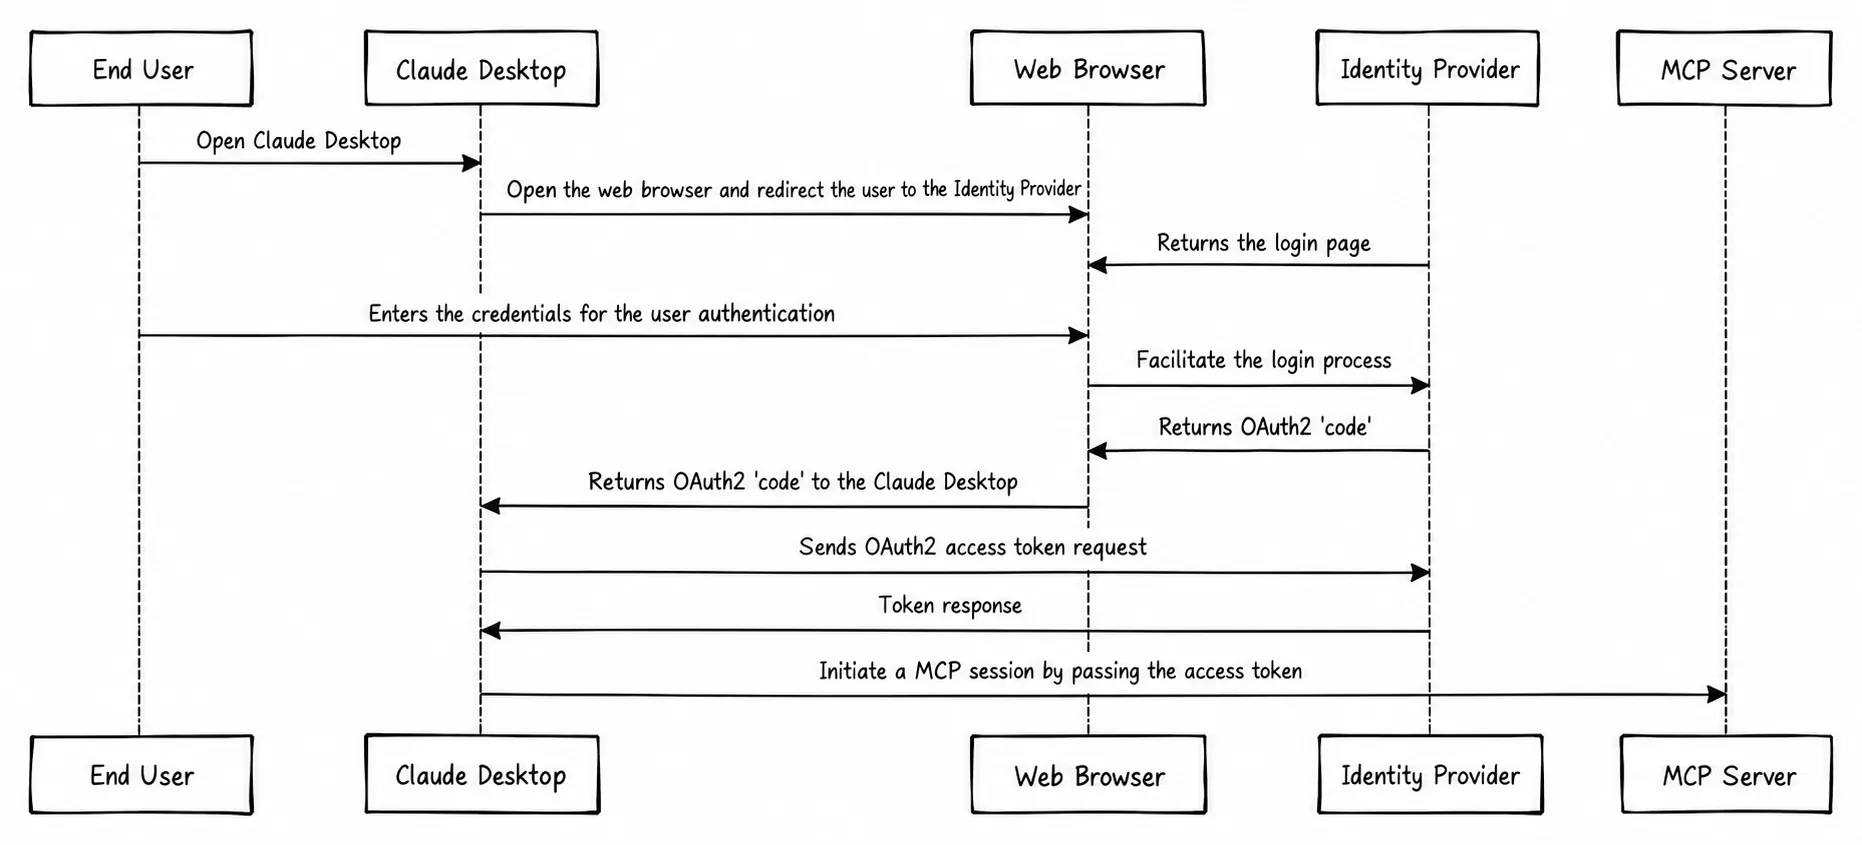
The following sequence diagram illustrates the complete security flow we walked through in this section.
For completeness, here’s the MCP request message for the listTransactions tool call:
{
  "method": "tools/call",
  "params": {
    "name": "listTransactions",
    "arguments": {
      "start_date": "2025-04-07T10:29:00Z",
      "end_date": "2025-04-27T10:29:00Z",
      "page_size": 10,
      "page": 1
    },
    "_meta": {
      "progressToken": 12
    }
  }
}
And the corresponding response:
{
  "transaction_details": [],
  "account_number": "fgdgt34413r4",
  "start_date": "2025-04-07T10:29:00+0000",
  "end_date": "2025-04-27T10:29:00+0000",
  "last_refreshed_datetime": "2025-05-07T08:29:59+0000",
  "page": 1,
  "total_items": 0,
  "total_pages": 0,
  "links": [
    {
      "href": "https://api.paypal.com/v1/reporting/transactions?end_date=2025-04-27T10%3A29%3A00Z&start_date=2025-04-07T10%3A29%3A00Z&page_size=10&page=1",
      "rel": "self",
      "method": "GET"
    }
  ]
}
I’ve skipped the MCP message flows beyond this point. I covered those in detail in the GitHub MCP Server walkthrough.
Wrap up
The primary goal of this post was to make the MCP security flow concrete showing exactly what MCP server developers and MCP host/client developers need to implement when using HTTP transport.
Here’s the current compliance picture based on the 2025-03-26 revision:
MCP Servers must:
- Support OAuth 2.1 Draft
- Should support OAuth 2.0 Authorization Server Metadata (RFC 8414)
- Should support OAuth 2.0 Dynamic Client Registration (RFC 7591)
MCP Clients must:
- Support OAuth 2.1 Draft
- Support OAuth 2.0 Authorization Server Metadata (RFC 8414)
- Should support OAuth 2.0 Dynamic Client Registration (RFC 7591)
Coming in future revisions (both MCP Servers and Clients):
- Must support OAuth 2.0 Protected Resource Metadata (RFC 9728)
Hope this gives you a practical picture of what MCP security looks like end to end, and what you’ll need to implement if you’re building an MCP server or host application. Stay tuned for the next post!