We started to see the popping up of MCP servers from various organizations — from tools used in software development all the way through retail, finance, healthcare, and entertainment industries — at an unprecedented scale and speed. And there’s no shortage of content out there that dives deep into MCP, covering the good, the bad, and all sorts of opinions.
In this post, I’m taking a slightly different approach. Rather than jumping straight into the protocol itself, I’ll unwrap the MCP protocol layer by layer — starting from the user experience, in this case the developer experience as we use the GitHub MCP server as our example today.
So, without any further due, let’s start our walk.
NOTE — this blog post is based on 2025–03–26 version of the MCP protocol.
The Experience
To begin, I’ve already created a simple React sample in VS Code using GitHub Copilot — just by giving natural language instructions (a.k.a. prompts). While this step isn’t directly related to our main discussion, I’m sharing the exact prompts I used to create and test the React web application project.
Create a React web application using the default Vite template
Other than the natural language instructions I gave, I haven’t touched the code at all. My next step was to create a proper README file, set up a GitHub repo, and commit and push the project to GitHub — again, all through natural language instructions. To do this, I simply installed the GitHub MCP Server as a Docker container running locally by adding this configuration snippet into the VS Code user setting file. I can start and stop the Docker instance though this file.
The GitHub MCP Server requires the following dependencies:
- A Docker runtime (Docker Desktop/Rancher Desktop).
- A GitHub PAT token with enough permission to create repository and commit/push.
First, I wanted to make sure everything was working fine by checking the GitHub ID with the following simple question.
What is my GitHub id?
At this stage, GitHub Copilot understands that it needs to run a tool called get_me, which is exposed by the GitHub MCP Server. In the following screen, you’ll see a very important aspect of the MCP protocol in action: the agent—GitHub Copilot—explicitly informs me that it needs to run the get_me tool and asks for my consent before doing so.
This is a very important principle of the MCP protocol. Users should clearly agree before anything is done with their data. They should always control what is shared and what actions are taken. Agent apps must show clear prompts that allow users to review and approve actions.

Once I gave permission, Copilot ran the tool, processed the response, and returned the result in natural language, as shown in the screenshot below.

Next, I asked it to create a new GitHub repository with the following simple instruction.
Create a GitHub repo caleld unwrapping-mcp-github
Again, just like before, GitHub Copilot asked for my consent to run a tool called create_repository.
(Well, it wasn’t intentional, but I had made a spelling mistake here — yet with the help of the LLM, GitHub Copilot still managed to process what I really wanted to achieve.)
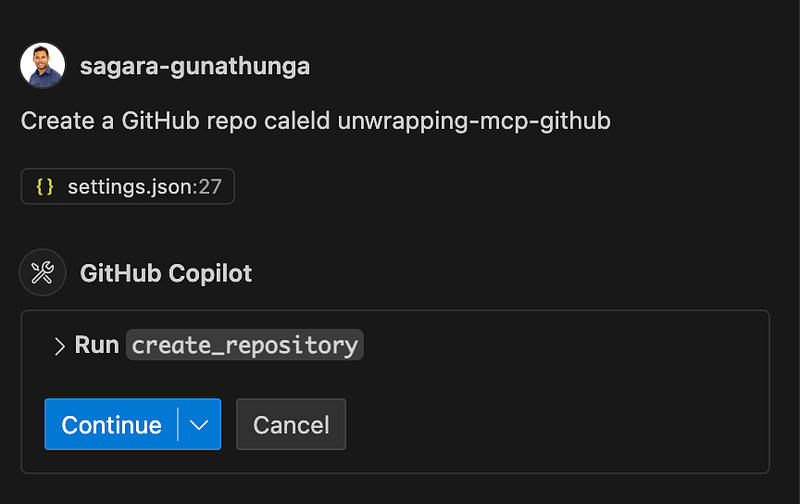
Once I confirmed, it ran the tool and showed me the URL of the newly created repo.

Finally, I asked Copilot to create a proper README file, commit, and push this code into the new repository — all with a single instruction.
create a proper README file, commit and push this code into the
newly created repo
This time, GitHub Copilot had to perform multiple tasks, and it asked for my explicit approval for each one. At the end, it displayed a success message confirming that the code was committed and pushed to the repo. You can check out the final version here.

Now you’ve seen a simple yet complete React application built entirely through GitHub Copilot and GitHub MCP Server — and along the way, we explored a key design principle of the MCP protocol.
Before we wrap up this section, let’s look at the main roles defined by the MCP protocol.

- Hosts: Agent applications that create and manage client instances and their lifecycle. They’re responsible for handling client connections and applying security policies. This includes tools like Claude Desktop, IDEs such as Cursor and Windsurf, or any AI-enabled applications that access data through MCP. In our example, VS Code acted as the host. As we’ve seen, the host also takes care of context aggregation across multiple clients and manages user authorization decisions.
- Clients: Connectors within the host application. Each client connects to a specific MCP server and maintains a 1:1 stateful session with that server. Clients are responsible for routing protocol messages in both directions — between the host and the server.
- Servers: Provide the context and capabilities via the MCP protocol. These capabilities can reside in the local environment (like accessing your file system or a local database), or they can offer remote access, similar to how the GitHub MCP Server communicates with GitHub’s APIs remotely.

The diagram below shows how all the components work together in our example use case at runtime.

At this point, one can ask a very valid question: given that at the end of the day the GitHub API is called, why not just directly call the GitHub API instead of going through several components? And why do we really have to invent a new protocol like MCP?
In fact, there are ready-made GitHub SDKs and even Terraform modules used by DevOps teams that make such integrations relatively easy.
To answer this question, the MCP protocol provides the following benefits over integrating directly through a proprietary API:
- Standardization and Simplified Integration — MCP acts as a universal connector just like USB-C, standardizing how systems — especially AI agents — connect to external data sources and APIs. Instead of building and maintaining separate, often complex connectors for every proprietary API, developers can integrate once with MCP and reuse that integration across multiple projects and models. This reduces code duplication, minimizes maintenance overhead, and streamlines onboarding of new tools or data sources. If you can recall, we did’t write any code or did’t use SDK during the above exercise.
- Capability Discovery for LLMs — MCP enables LLMs to automatically discover what capabilities are available on a server. This means LLMs can dynamically understand and tap into new functionality — no manual prompt engineering or hardcoding required. The result? AI applications that are more adaptive and extensible out of the box.
- Improved Security, Compliance, and Maintenance — With authentication, access control, and data retrieval managed centrally by MCP, the risk of security breaches and compliance headaches is reduced. There’s no need to store credentials or intermediary data across different systems.
Let’s wrap up this section with the following quite from the spec about the purpose of the MCP protocol.
Model Context Protocol (MCP) is an open protocol that enables seamless integration between LLM applications and external data sources and tools. Whether you’re building an AI-powered IDE, enhancing a chat interface, or creating custom AI workflows, MCP provides a standardized way to connect LLMs with the context they need.
The Messages and the Flow
In this section, let’s move to the next layer to understand various messages going back and forth as well as the flow. To begin, let’s connect the GitHub MCP Server to a tool called MCP Inspector, which facilitates debugging MCP servers and allows us to look at message-level interactions more easily.
You can run both the MCP Inspector and GitHub MCP Server locally. Once you configure MCP Inspector to connect with the GitHub MCP Server, you should be able to see a screen similar to the one below. Considering the length of this post, I’ve included instructions on how to configure and connect the GitHub MCP Server with MCP Inspector here, in case you’re interested in trying this out yourself.

As I highlighted in the above diagram, a MCP server offers three types of features called Resource, Prompts and Tools. Let’s briefly look at each of them.
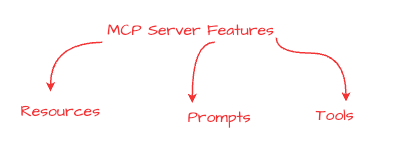
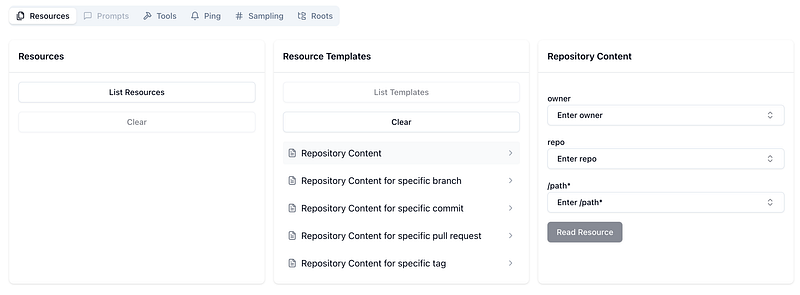
- Resources (Structured Data for Context) — Resources in MCP are application-controlled data sources that servers expose to clients, allowing Large Language Models (LLMs) to access external content as context for their interactions. These can include files, database records, API responses, system logs, images, or any other data the model might need. In our case, as shown below, you can see a set of resource templates to interact with the artefacts managed by the Github.
- Prompts (Predefined Templates for Optimal Use) — Prompts in MCP are user-controlled templates designed to guide how LLMs interact with tools or resources. By providing structured, pre-defined prompts, users or developers can ensure that the AI leverages external data or functions in the most effective way.
- Tools (Model-Controlled Functionality) — Tools in MCP represent model-controlled functions that LLMs can call to perform specific actions — similar to function calling or invoking APIs. In the following screenshot you can find tools expose by the Github MCP server and we have already used a bunch of them during the above exercise.

Now let’s look into the flow of the MCP protocol. MCP is stateful protocol and defines a connection lifecycle between a client and server in three phases, as shown in the following diagram.

During the first phase — known as the initialization phase — the client and server agree on a specific version of the protocol and exchange capabilities. The server declares capabilities like resource subscriptions, tool support, and prompt templates. The client declares its own capabilities like sampling support and notification handling. Both parties must respect the declared capabilities throughout the session. MCP protocol uses JSON-RPC as the messaging format.
Here is the exact message that our client, MCP Inspector, sent to the GitHub MCP server — this is called an initialize request. Since MCP Inspector is a testing and debugging tool (not a production client), it hasn’t sent any capabilities in this message.
{
“method”: “initialize”
}
Then the GitHub MCP server returns with its own capabilities and information, as shown in the following example.
{
“capabilities”: {
“logging”: {},
“resources”: {
“subscribe”: true,
“listChanged”: true
},
“tools”: {
“listChanged”: true
}
},
“serverInfo”: {
“name”: “github-mcp-server”,
“version”: “v0.2.1”
}
}
Once this exchange is complete and a session is established, the second phase begins — the operation phase — where the client and server exchange messages based on the negotiated capabilities.
To see what tools are available, we can invoke the tools/list method using the following request message.
{
“method”: “tools/list”,
“params”: {}
}
The MCP server returns with a list of available tools. In our case, the GitHub MCP server exposes quite a large number of tools — the following response message is truncated to fit this post.
{
“tools”: [
{
  "name": "get\_me",
  "description": "Get details of the authenticated GitHub user.
                       Use this when a request include \\"me\\", \\"my\\"...",
  "inputSchema": {
    "type": "object",
    "properties": {
      "reason": {
        "description": "Optional: reason the session was created",
        "type": "string"
      }
    }
  }
}
]
}
Next, we can run one of these tools. For example, we invoke the tools/call method by passing get_me as the parameter, which is the name of the tool we want to run.
{
“method”: “tools/call”,
“params”: {
“name”: “get_me”,
“arguments”: {}
},
“jsonrpc”: “2.0”,
“id”: 5
}
This time, the GitHub MCP server returns my GitHub username and other details in the response. This is the exact same flow that occurred when we executed the get_me tool using VS Code in the previous section of this post.
{
“method”: “tools/call”,
“data”: {
“content”: [
{
“type”: “text”,
“text”:”{\“login\”:\“sagara-gunathunga\”, …”
}
]
}
}
Finally, one of the parties closes the connection to complete the lifecycle and terminate the session.
Just to be clear: with agentic applications like VS Code, Claude desktop, you don’t need to manually hand craft any of these messages or run any tools by yourselves. Instead, when we provide a prompt, the application (with the help of the LLM) can automatically pick the right tool to execute and handle this entire client-server session for us.
MCP Transports
MCP uses JSON-RPC to encode messages, and JSON-RPC messages MUST be UTF-8 encoded. The protocol currently defines two standard transport mechanisms for client-server communication:
- STDIO — communication over standard input and standard output
- Streamable HTTP and SSE
In addition to these, it’s also possible for clients and servers to implement custom transports in a pluggable fashion.
During both exercises we did in this post — connecting the GitHub MCP Server with VS Code and MCP Inspector — we used the STDIO transport. In this section, we’ll only focus on STDIO, and we’ll discuss HTTP transport in a separate post.
STDIO stands for “standard input/output,” which is a fundamental way programs communicate by reading input and writing output through streams provided by the operating system. Standard input (stdin) is typically used for reading data, while standard output (stdout) is for writing data.
MCP lets a client and server exchange messages directly by sending and receiving data over these streams. When an MCP server runs as a subprocess, it reads client requests from its standard input and writes responses to standard output. This concept is depicted in the following diagram.

Using STDIO for MCP client-server communication is often recommended over HTTP/SSE because it offers a simpler, more efficient, and secure transport mechanism for local integrations. STDIO enables direct, bidirectional communication between the client and server processes on the same machine without the overhead of network protocols, reducing latency and complexity. Unlike HTTP/SSE, which requires setting up servers, managing network connections, and handling OAuth 2.1 security requirements, STDIO leverages the operating system’s built-in streams — making it ideal for tightly coupled, local environments where performance and simplicity are priorities.
Wrap up
We started this post by looking at what kind of experience an MCP server can bring in — by creating and committing a complete web application without any manual intervention using VS Code Copilot together with the GitHub MCP server. Then in the next phase, we connected GitHub MCP to a debugging tool called MCP Inspector so that we could clearly see the messages and protocol flow, and we discussed what exactly happens at each stage of the flow with the exact messages.
Finally, we looked into the transport mechanisms supported by MCP and dug into the details of STDIO transport.
The GitHub MCP server was taken as an example because it perfectly fits with the sample use case used in this post — but everything we discussed is common for any MCP server, after all, that’s the whole purpose of the MCP protocol.
Hope this is helpful and stay tuned for the next post!