So far in this blog series, we’ve explored whether the OAuth2 authorization code grant type has any security imperfections. We’ve already covered how to strengthen the authorization request using JWT-Secured Authorization Request (JAR) and Pushed Authorization Request (PAR) specifications to address several key issues. In this post, I’d like to shift our focus to the authorization response — and specifically, how we can enhance its security using the JWT Secured Authorization Response Mode (JARM).
Secure OAuth2 : Is Authorization Code Grant Type Secure Enough?
_The authorization code grant type is generally considered as the most secure, widely used and commonly recommended…_sagarag.medium.com
But before we dive into the details of JWT Secured Authorization Response Mode (JARM), let’s quickly recap the potential security concerns related to the authorization response in the standard authorization code flow. If you haven’t read the first post in this series, I’d highly recommend checking it out before diving into this one.
P5 — Server integrity protection failure
P6 — Client confidentiality failure
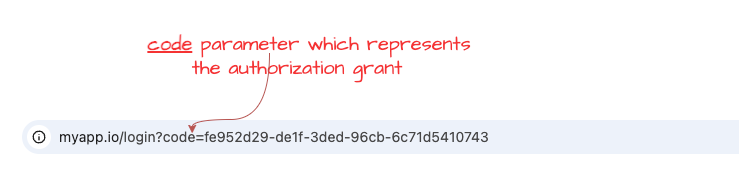
Now, let’s begin our discussion by looking at the following diagram. It shows how the code parameter—which represents the authorization grant—is returned to the client application. This is typically done by appending it as a parameter to the registered redirect URL, and it’s passed through the user agent, such as a browser. The key issue here is that there’s no built-in mechanism for the client application to verify whether the authorization response was altered or tampered with during transit, or even to confirm that it genuinely originated from the legitimate authorization server. From the client’s perspective, this lack of validation represents an integrity protection failure. Moreover, there’s no way to apply cryptographic protections—like signing or encryption—to the authorization response in this standard flow.
If you recall the second post in this series, we explored how the JWT-Secured Authorization Request (JAR) specification addresses similar issues on the request side. JAR introduces the concept of a Request Object, which wraps the request parameters inside a signed and optionally encrypted JWT to ensure integrity, confidentiality, and source authentication.
Secure OAuth2 (Part -2): Put it in a JAR (JWT-Secured Authorization Request)
_In my last post — which I published almost a year ago — I explored whether the authorization code grant type truly…_sagarag.medium.com
Applying the same principle to the authorization response makes a lot of sense — and that’s exactly what the JWT-Secured Authorization Response Mode (JARM) specification does. JWT Secured Authorization Response Mode (JARM) was developed by OpenID Foundation’s FAPI working group and became a stable specification in 2021. In a nutshell, just as the JAR secures the authorization request, JARM secures the authorization response by encapsulating it in a signed (and optionally encrypted) JWT.
One important point to highlight here is that when we talk about the authorization server response in the context of JWT Secured Authorization Response Mode (JARM), it includes both success and error responses. That means even an error message is encoded inside a JWT, and generally, we refer to this as the JWT response document.
Response Mode and Response Type
To put JWT Secured Authorization Response Mode (JARM) into action, the client application simply needs to indicate — in the authorization request — that it expects the authorization server to return the response in a JWT format. This is done using a request parameter called response_mode, which comes from another specification by the OpenID Foundation: OAuth 2.0 Multiple Response Type Encoding Practices.
The response_mode parameter tells the authorization server how to return the authorization response from the authorization endpoint. This makes it a perfect fit for what JWT Secured Authorization Response Mode (JARM) is trying to achieve. While JWT Secured Authorization Response Mode (JARM) still uses the same redirection mechanism to send the user back to the client application using the registered redirect URI, it introduces a new parameter called response, which carries the JWT response document as part of that redirect. To provide more flexibility, JWT Secured Authorization Response Mode (JARM) defines four **response_mode** values that let developers choose how the JWT should be delivered to the client application. These are:
**query.jwt**– The JWT response is added as a query parameter to the redirect URI.**fragment.jwt**– The JWT response is added as a URI fragment.**form_post.jwt**– The JWT response is embedded as an HTML form field and auto-submitted via an HTTP POST.**jwt**– A shorthand value that uses the default mechanism (query or fragment) based on theresponse_typeparamter discssed below.
Now, what exactly goes inside the JWT response document depends on another authorization request parameter called response_type. This one should be familiar—it’s defined in the core OAuth2 specification ( section 3.1.1) and used to distinguish between different grant types supported by the authorization endpoint. Due to it’s extensibility, the above-mentioned OAuth 2.0 Multiple Response Type Encoding Practices specification from OpenID foundation extends the use of response_type by defining multiple and new response types to be used with the OpenID Connect protocol.For this blog series, though, we’re sticking with the authorization code grant type, where the response_type is set to code.
As you can see in the following sample request, other than adding query query.jwt as the value of response type there is no change to the authorization request.

Now, let’s look at the authorization server’s response for the above request. You can see that the JWT response is added as a query parameter using the response. Note that, given we stick with response_type=code as the scope of this post, passing response_mode=jwt also returns the same result.

If we use fragment.jwtas the value of the response_mode parameter, the authorisation request will looks likes the following.
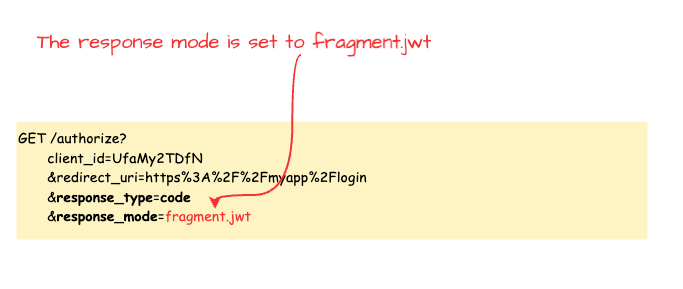
In this case, the authorization response will be modified as shown in the following example. As you can see, the JWT response is appended as a fragment to the redirect URI.

Finally, if we use form_post.jwt as the value of the response_mode parameter, the authorization request would look like the example below.
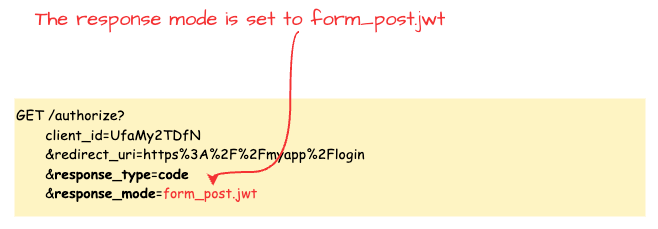
Unlike the previous two cases, here the authorization server submits the JWT authorization response to the client application using an HTTP POST. As a result, the JWT response won’t be visible in the browser URL. Instead, the application receives it as part of a form submission, similar to the one shown below.

One important point to mention here is that, in the examples above, I used the authorization request as in the standard authorization code grant type — mainly to keep things simple and easier to follow. However, the JWT Secured Authorization Response Mode (JARM) specification can absolutely be used alongside the JWT-Secured Authorization Request (JAR) and Pushed Authorization Request (PAR) specifications, which significantly enhance the security of the authorization request phase. If you want to use JWT Secured Authorization Response Mode (JARM) along withJWT-Secured Authorization Request (JAR) and Pushed Authorization Request (PAR), you just need to include the response_mode and response_type parameters within the Request Object or the PAR request—nothing else changes.
No matter how the client application receives the JWT-encoded authorization response, once you decode it, you’ll see a JWT that looks something like the example below. As with any JWT, there are a few standard claims you’ll always find:
iss: the issuer URL of the authorization serveraud: theclient_idof the client applicationexp: the expiration time of the JWT that is usually less than o10 minutes
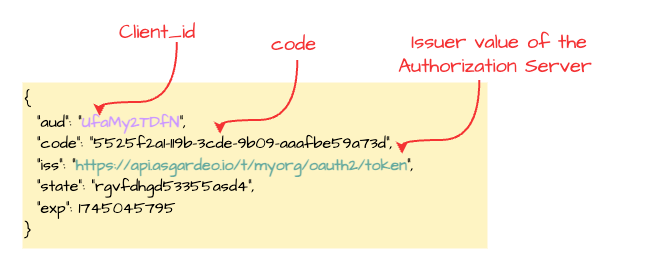
As mentioned earlier, the exact claims included in the JWT will depend on the value of the response_type parameter. For example, when response_type=code, you’ll find the code claim (which is the authorization code) along with the state value originally sent by the client.
If the authorization response indicates an error, the JWT will contain an error claim representing the error code. It may also include optional claims like error_description, error_uri, and state, as shown in the example below.

If the JWT is encrypted, the client first needs to decrypt it. This is usually done using the default encryption key associated with the authorization server, or in some cases, a key identified by the kid (key ID) in the JWT header if it’s avilable. The key could be either a private key (with the corresponding public key registered in the client’s metadata) or a key derived from the client secret.
Once decrypted, the client should check the following:
- The
iss(issuer) claim should match the expected authorization server. If it doesn’t, the client should reject the response. - The
aud(audience) claim should match theclient_idthe client used in the original request. If not, the response should be rejected. - The
exp(expiration) claim tells the client if the JWT is still valid. If it’s expired, the response must be rejected. - Finally, the client must validate the signature of the JWT to make sure it hasn’t been tampered with. If the
**alg**value is**none**in the JOSE header then the response should be rejected and If the signature check fails, the response should be rejected as well.
Sinceses JWTs and requires successful signature validation, it naturally provides integrity protection, source authentication, audience restriction, and protection from mix-up attacks. And when the JWT is encrypted, it also ensures confidentiality.
JARM in Action
At this point, we’ve covered the key details you need to understand about the JWT Secured Authorization Response Mode (JARM) specification and how it helps improve the security of the authorization response of the authorization code grant type. Before wrapping up this post, I want to give you a set of instructions to run a quick hands-on demo to see JWT Secured Authorization Response Mode (JARM) in action using a cloud-based identity provider. It should only take about 5 minutes.
For this demo, I’ll be using Asgardeo — a cloud identity service by WSO2. It fully supports the JWT Secured Authorization Response Mode (JARM) specification and comes with a generous free tier, making it a great option to try out your identity use cases.

Step 1 — Configure Asgardeo
If you don’t already have an Asgardeo account, you can sign up here. Once you’re logged in:
- Create a new Traditional Web Application from the left-side menu and Keep OpenID Connect selected as the protocol (this is the default). For the Authorized redirect URLs, enter
[https://myapp.io/login](https://myapp.io/login)as the value. Then save the application settings. - Next follow this guide to create a test user, which you’ll use later in this flow.
Step 2 — Set Up Postman
Next, you’ll need to configure Postman. First, Download this Postman collection for this demo. Open the collection and update the collection variables with the following values, which you can copy from your Asgardeo application:
[authorize_ep](https://myapp.io/login)— Token Endpoint URL from the Info tab.token_ep— Authorization Endpoint URL from the Info tab.client_id— Client ID protocol tab.client_secret— Client Secret protocol tab.
Step 3 — Execute the Flow
- Since Postman can’t simulate browser-based redirects, we’ll take a small manual step here. Open the Code Snippet tab for each request ( e.g — [Browser]jarm-query.jwt) from the right-hand menu in Postman and select cURL from the dropdown. Then copy the
locationvalue from the cURL snippet. This URL includes the correctresponse_modeandresponse_typevalues. Finally paste that URL into your browser’s address bar and hit Enter. - You should now be redirected to Asgardeo’s login screen. Enter the credentials of the test user you created earlier. If authentication is successful, you’ll be redirected to the callback URL with JWT authorization response which you can decode from your prefred JWT decoder tool.
- Go back to Postman and open the
**Token-Request**request. Paste the copiedcodeinto thecodeparameter in the request body and send the request. If everything is set up correctly, you should receive a valid token from Asgardeo.
This quick walkthrough shows how easy it is to implement JWT Secured Authorization Response Mode (JARM) using a modern identity platform.
So far in this series, we’ve looked at how to secure the authorization request using JWT-Secured Authorization Request (JAR) and Pushed Authorization Request (PAR), and in this post, we focused on how JWT Secured Authorization Response Mode (JARM) strengthens the authorization response. With these improvements in place, we’ve successfully addressed all the security concerns we identified in the very first post of this series. As we are reaching the end of this blog series, stay tune for the last post of the series.
Other posts in the secure OAuth2 series
Read the other posts in Secure OAuth2 series.
Secure OAuth2 : Is Authorization Code Grant Type Secure Enough?
_The authorization code grant type is generally considered as the most secure, widely used and commonly recommended…_sagarag.medium.com
Secure OAuth2 (Part -2): Put it in a JAR (JWT-Secured Authorization Request)
_In my last post — which I published almost a year ago — I explored whether the authorization code grant type truly…_sagarag.medium.com
Secure OAuth2 (Part -3) : Push Authorization Request (PAR) to Rescue
_In the very first post of this series, I explored whether the authorization code grant type truly provides the highest…_sagarag.medium.com