In the very first post of this series, I explored whether the authorization code grant type truly provides the highest level of security — and what potential risks it might carry. This grant type is widely regarded as the recommended option when involving end users, both in OAuth 2.0 best current practices and the OAuth 2.1 draft specification. If you haven’t already, I highly recommend reading that first post before diving into this one.
Secure OAuth2 : Is Authorization Code Grant Type Secure Enough?
_The authorization code grant type is generally considered as the most secure, widely used and commonly recommended…_sagarag.medium.com
Just to recap, the potential security shortcomings in the authorization request of the authorization code flow includes:
P1 — Integrity protection failure
P2 — Source Authentication Failure
P4 — Lack of Request as a Reference semantic
The implications tied to the authorization response of the authorization code flow includes:
P5 — Server integrity protection failure
P6 — Client confidentiality failure
In the most recent post, we looked at how JWT-Secured Authorization Request (JAR) helps address some of those concerns by introducing the concept of a Request Object — essentially a JWT that can be signed (JWS) and encrypted (JWE) to offer integrity protection, source authentication, and confidentiality. We also touched on the request-by-reference semantics in the JAR spec, which remain open-ended and somewhat vague for implementation.
Secure OAuth2 (Part -2): Put it in a JAR (JWT-Secured Authorization Request)
_In my last post — which I published almost a year ago — I explored whether the authorization code grant type truly…_sagarag.medium.com
In this post, I’ll continue our conversation by introducing another spec in the OAuth 2.0 ecosystem: Pushed Authorization Requests (PAR). We’ll look at how PAR and JAR complement each other to bring maximum security to the authorization request process

Making Authorization Code grant more secure
If we go back to the following diagram — which captures the last point I discussed in my previous post on JWT-Secured Authorization Request (JAR) — you’ll see how a signed and optionally encrypted Request Object can be sent to the Authorization Server as a reference, rather than being passed directly in the authorization request.

This approach makes use of the request_uri parameter, introduced in the JAR specification, to point to a URI where the Request Object is stored. It’s a smart way to ensure confidentiality in the authorization request and is especially handy in resource-constrained environments, like mobile devices, where sending large requests via the user agent isn’t always practical.
However, despite these benefits, the JAR spec has a few open-end areas related to pass by reference approach. It doesn’t define a standard mechanism or location for storing the Request Object. It’s a bit too open — your options include a local client location, a remote location at the Authorization Server, or even a trusted third-party location. On top of that, there’s no clear guidance on how to store the Request Object, what security measures should be applied, or how the Authorization Server is supposed to fetch it securely. Another limitation is that the send-by-reference approach in JAR is tightly coupled with the use of the Request Object itself. That makes it a less-than-ideal fit for simpler use cases where a full JWT-based Request Object might be overkill.
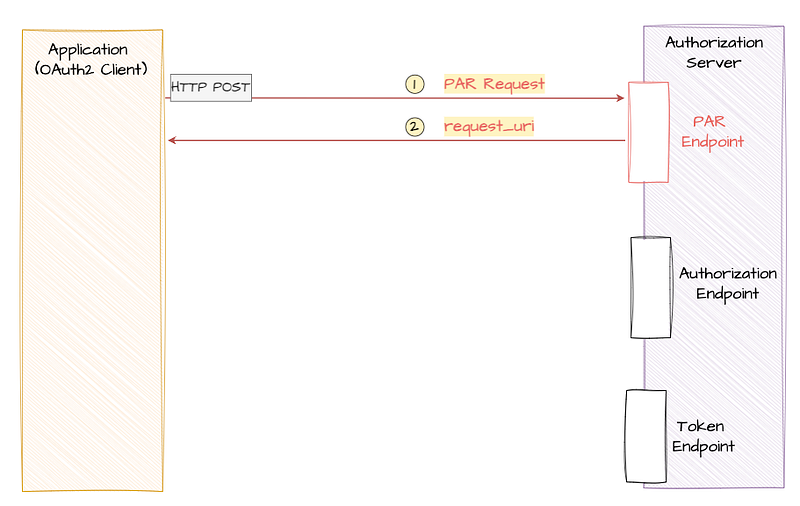
This is exactly where Pushed Authorization Requests (PAR) come in. The PAR specification introduces a dedicated endpoint called Pushed Authorization Request Endpoint (PAR endpoint in short) at the Authorization Server. This endpoint offers a generic, secure, and standardized way to achieve request-by-reference semantics. In the standard Authorization Code flow, the client sends the authorization request by directing the user agent — typically a web browser — to make an HTTP GET request to the authorization server’s authorization endpoint. PAR, however, introduces a key shift: it splits the authorization request into two distinct steps — and this change plays a big role in strengthening the overall security of the flow.
Let’s now walk through that protocol flow step by step.
With Pushed Authorization Requests (PAR), the flow begins when the client application sends a HTTP **POST** request—called a pushed authorization request, or simply PAR request—to a newly introduced PAR endpoint on the authorization server. Just like the token request that happens later in the flow, this is a direct client-to-server call via TLS encrypted HTTP channel, with no involvement from the user agent (i.e., the browser).
Later in this post, we’ll look at how you can include a Request Object (as defined by the JAR spec) in the PAR request. But the beauty of PAR is that you don’t have to — you can simply send the request parameters encoded within the body of HTTP POST message, making it much more flexible.
Here’s what a sample PAR request looks like…

Just like in the standard authorization request, a PAR request includes parameters like client_id, redirect_uri, response_type, and scope, but this time they’re encoded in the body of the HTTP POST request instead of encoding them as URL parameters in the GET call used in the authorization request of the standard authorization code grant flow. It’s important to note that the response_type should be set to 'code'.
The PAR endpoint is designed to accept any parameter defined by the OAuth 2.0 core specification for the authorization request, as well as any supported extensions. For example, you can easily use PKCE (Proof Key for Code Exchange) with PAR. And since OIDC (OpenID Connect) is technically an OAuth 2.0 extension, PAR works with OIDC too.
One key difference compared to the traditional approach is that, in PAR confidential clients must authenticate with the authorization server right at this first step — before any user interaction happens. This is clearly a security enhancement. In the above example, the client authenticates using a client_secret, but you can use any supported method, including mutual TLS (mTLS), private_key_jwt, etc.
Now, once the authorization server receives the PAR request, it performs client authentication and request validation. If everything checks out, it generates a **request_uri** (yep—the same one we discussed in the last post on JAR) and sends it back to the client, along with an expires_in value indicating how long the request_uri is valid. If something goes wrong, the server responds with a JSON-formatted error. The diagram below illustrates a successful PAR response.

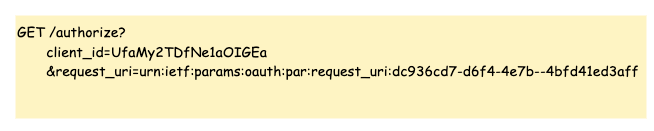
Now with the **request_uri** in hand, the client application can build the authorization request URL, similar to how it’s done in the traditional flow. The only real difference is that, other than client_id, none of the sensitive request parameters are included in the URL anymore—they’re all safely tucked away in the previously sent PAR request. Here’s an example of what that request might look like.
Finally, once the user authenticates and authorizes the request, the authorization server sends back an authorization grant using the code parameter appended to the redirect URI—just like in the standard flow. It’s important to note that PAR does’t not introduce any change except the above discussed modifications to the authorization request flow. The complete authorization code grant flow with the introduction of PAR is depicted in the following diagram.

PAR offers a major security and usability improvement for a couple of reasons:
- The request parameters no longer travel through the browser, which eliminates exposure to the end user and solves both P3 — Confidentiality failure and P4 — Lack of Request as a Reference semantic that we discussed in this series.
- It also solves the issue of handling large request payloads, since those are now sent directly over a secure connection instead of being embedded in a URL making this is a preferable for resource constraint mobile devices and also in environments low internet connectivity.
The following diagram provides comparison between standard authorization code grant flow and authorization code grant flow with PAR.

Request Object support
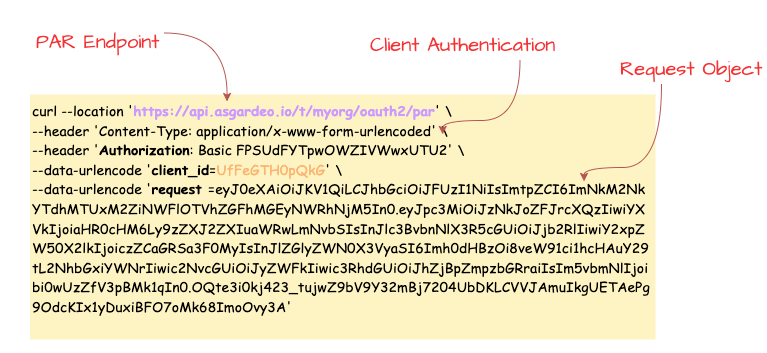
In situations where you need tighter security controls — like when working with sensitive data or operating in high-stakes industries such as finance or healthcare — you can take things a step further. Instead of directly encoding each authorization request parameter in the body of the PAR request, you can use a signed (and optionally encrypted) Request Object, which we explored in detail in my previous post on JAR.
In this approach, the signed and/or encrypted Request Object is added to the PAR request using the request parameter ( the one defined in the JAR specification). This lets you combine the benefits of PAR and JAR, giving you the highest level of security—something that’s more than sufficient for even the most regulated industries.
Take a look at the example below to see how this looks like in PAR request. Instead of passing individual parameters like redirect_uri, scope, etc., directly in the body of the POST request, here you’re wrapping them all in a signed JWT and attaching that via the request parameter.
Once the authorization server receives this PAR request, it goes through the usual steps: authenticates the client, decrypts the Request Object if it’s encrypted, verifies the signature, performs any additional validation, and finally responds with a request_uri. This request_uri will then be used in the next stage of the flow, just like before.
So, other than swapping individual parameters for a Request Object , the flow remains the same—but now you’ve layered in an extra level of protection.
Dynamic Redirect URIs
The core OAuth 2.0 specification is actually a bit relaxed when it comes to callback URLs. It allows scenarios where only part of the callback URL is registered — or, in some cases, where no redirect URI is pre-registered at all. This gives client applications a bit of wiggle room to send dynamically constructed callback URLs along with their authorization requests.
However, both the OAuth2 Best Current Practice and the OAuth 2.1 draft spec strongly recommend that authorization servers require an exact match between the redirect_uri used in a request and one that was pre-registered by the client. In fact, most identity vendors have already adopted this stricter behavior. And it makes sense—this practice helps prevent client impersonation, token leakage, and open redirection vulnerabilities.
That said, in some cases, dynamically generating a callback URL per transaction is just a better architectural fit — especially for certain app designs. With PAR, that exact redirect URI matching requirement can be relaxed — but only under specific conditions. Since PAR introduces client authentication before the authorization request gets processed, the authorization server can be sure it’s dealing with a legitimate client. That means it can allow redirect URIs that weren’t pre-registered, giving your app the flexibility to use dynamic redirect URIs, say, to model per-session or transaction use cases. Of course, this flexibility isn’t mandatory — it’s up to the authorization server to support it or not. And even if it does, it should be used thoughtfully to avoid introducing security risks.
Authorization Server Metadata
The PAR specification also introduces a few metadata additions that make life easier for client applications. One of them is a new parameter called **pushed_authorization_request_endpoint**. This shows up in the server’s metadata document and tells client apps exactly where to send their PAR requests.
Given the client authentication rules used for token endpoint are also applicable to the PAR endpoint the existing metadata parameter **token_endpoint_auth_methods_supported** is applicable for PAR endpoint as well—it tells you which client authentication methods are accepted at the PAR endpoint.
Additionally the **require_pushed_authorization_requests** parameter indicates whether the use of PAR is mandatory or not. When is set to true, it means the authorization server only accepts authorization requests that go through PAR.
PAR in Action
At this point, we’ve covered most of the important details around the Pushed Authorization Requests (PAR) specification that you’ll need when applying it in real-world scenarios. Before we wrap up this post, I’d like to walk you through a quick hands-on demonstration to see PAR in action using a cloud-based identity provider. This should only take around 5 minutes.
For this, I’ll be using Asgardeo — a public identity cloud offering from WSO2. It supports the PAR specification and comes with a generous free tier, which makes it a great option for testing your identity use cases.

Step 1 — Configure Asgardeo
If you don’t already have an Asgardeo account, you can sign up here. Once you’re logged in:
- Create a new Traditional Web Application from the left-side menu and Keep OpenID Connect selected as the protocol (this is the default). For the Authorized redirect URLs, enter
[https://myapp.io/login](https://myapp.io/login)as the value. Then save the application settings. - Next follow this guide to create a test user, which you’ll use later in this flow.
Step 2 — Set Up Postman
Next, you’ll need to configure Postman. First, Download this Postman collection for this demo. Open the collection and update the collection variables with the following values, which you can copy from your Asgardeo application:
par_ep—PAR Endpoint URL from the Info tab.[authorize_ep](https://myapp.io/login)— Token Endpoint URL from the Info tab.token_ep— Authorization Endpoint URL from the Info tab.client_id— Client ID protocol tab.client_secret— Client Secret protocol tab.
Step 3 — Execute the Flow
- Run the
**PAR-Request**request from the Postman collection. You should receive a response containing arequest_uri. This value is key to constructing the authorization request. - Since Postman can’t simulate browser-based redirects, we’ll take a small manual step here. Open the Code Snippet tab from the right-hand menu in Postman and select cURL from the dropdown. Then copy the
locationvalue from the cURL snippet. This URL includes therequest_urifrom the previous step. Finally paste that URL into your browser’s address bar and hit Enter. - You should now be redirected to Asgardeo’s login screen. Enter the credentials of the test user you created earlier. If authentication is successful, you’ll be redirected to the callback URL with a
codeparameter in the query string. This is your authorization code. Copy the value of thecodefor the next step. - Go back to Postman and open the
**Token-Request**request. Paste the copiedcodeinto thecodeparameter in the request body and send the request. If everything is set up correctly, you should receive a valid token from Asgardeo.
This quick walkthrough shows how easy it is to implement PAR using a modern identity platform.
This post is the third part of my Secure OAuth2 series. We explored how the Pushed Authorization Requests (PAR) specification enhances the standard authorization code flow by introducing confidentiality, source authentication, and a more secure “pass by reference” mechanism for authorization requests.
At this point, we’ve covered both JWT-Secured Authorization Request (JAR) and Pushed Authorization Requests (PAR )— two important specifications that together help address the four security concerns: P1 — Integrity protection failure, P2 — Source Authentication Failure, P3 — Confidentiality failure, P4 — Lack of Request as a Reference semantic . These two specifications significantly strengthen the request side of the authorization flow.
In the next post, we’ll shift our focus to the response flow, which we haven’t fully explored yet. There are still a few important details to unpack in order to make the entire OAuth2 flow as secure and robust as possible — so stay tuned!
Other posts in the secure OAuth2 series
Read the other posts in Secure OAuth2 series.
Secure OAuth2 : Is Authorization Code Grant Type Secure Enough?
_The authorization code grant type is generally considered as the most secure, widely used and commonly recommended…_sagarag.medium.com
Secure OAuth2 (Part -2): Put it in a JAR (JWT-Secured Authorization Request)
_In my last post — which I published almost a year ago — I explored whether the authorization code grant type truly…_sagarag.medium.com