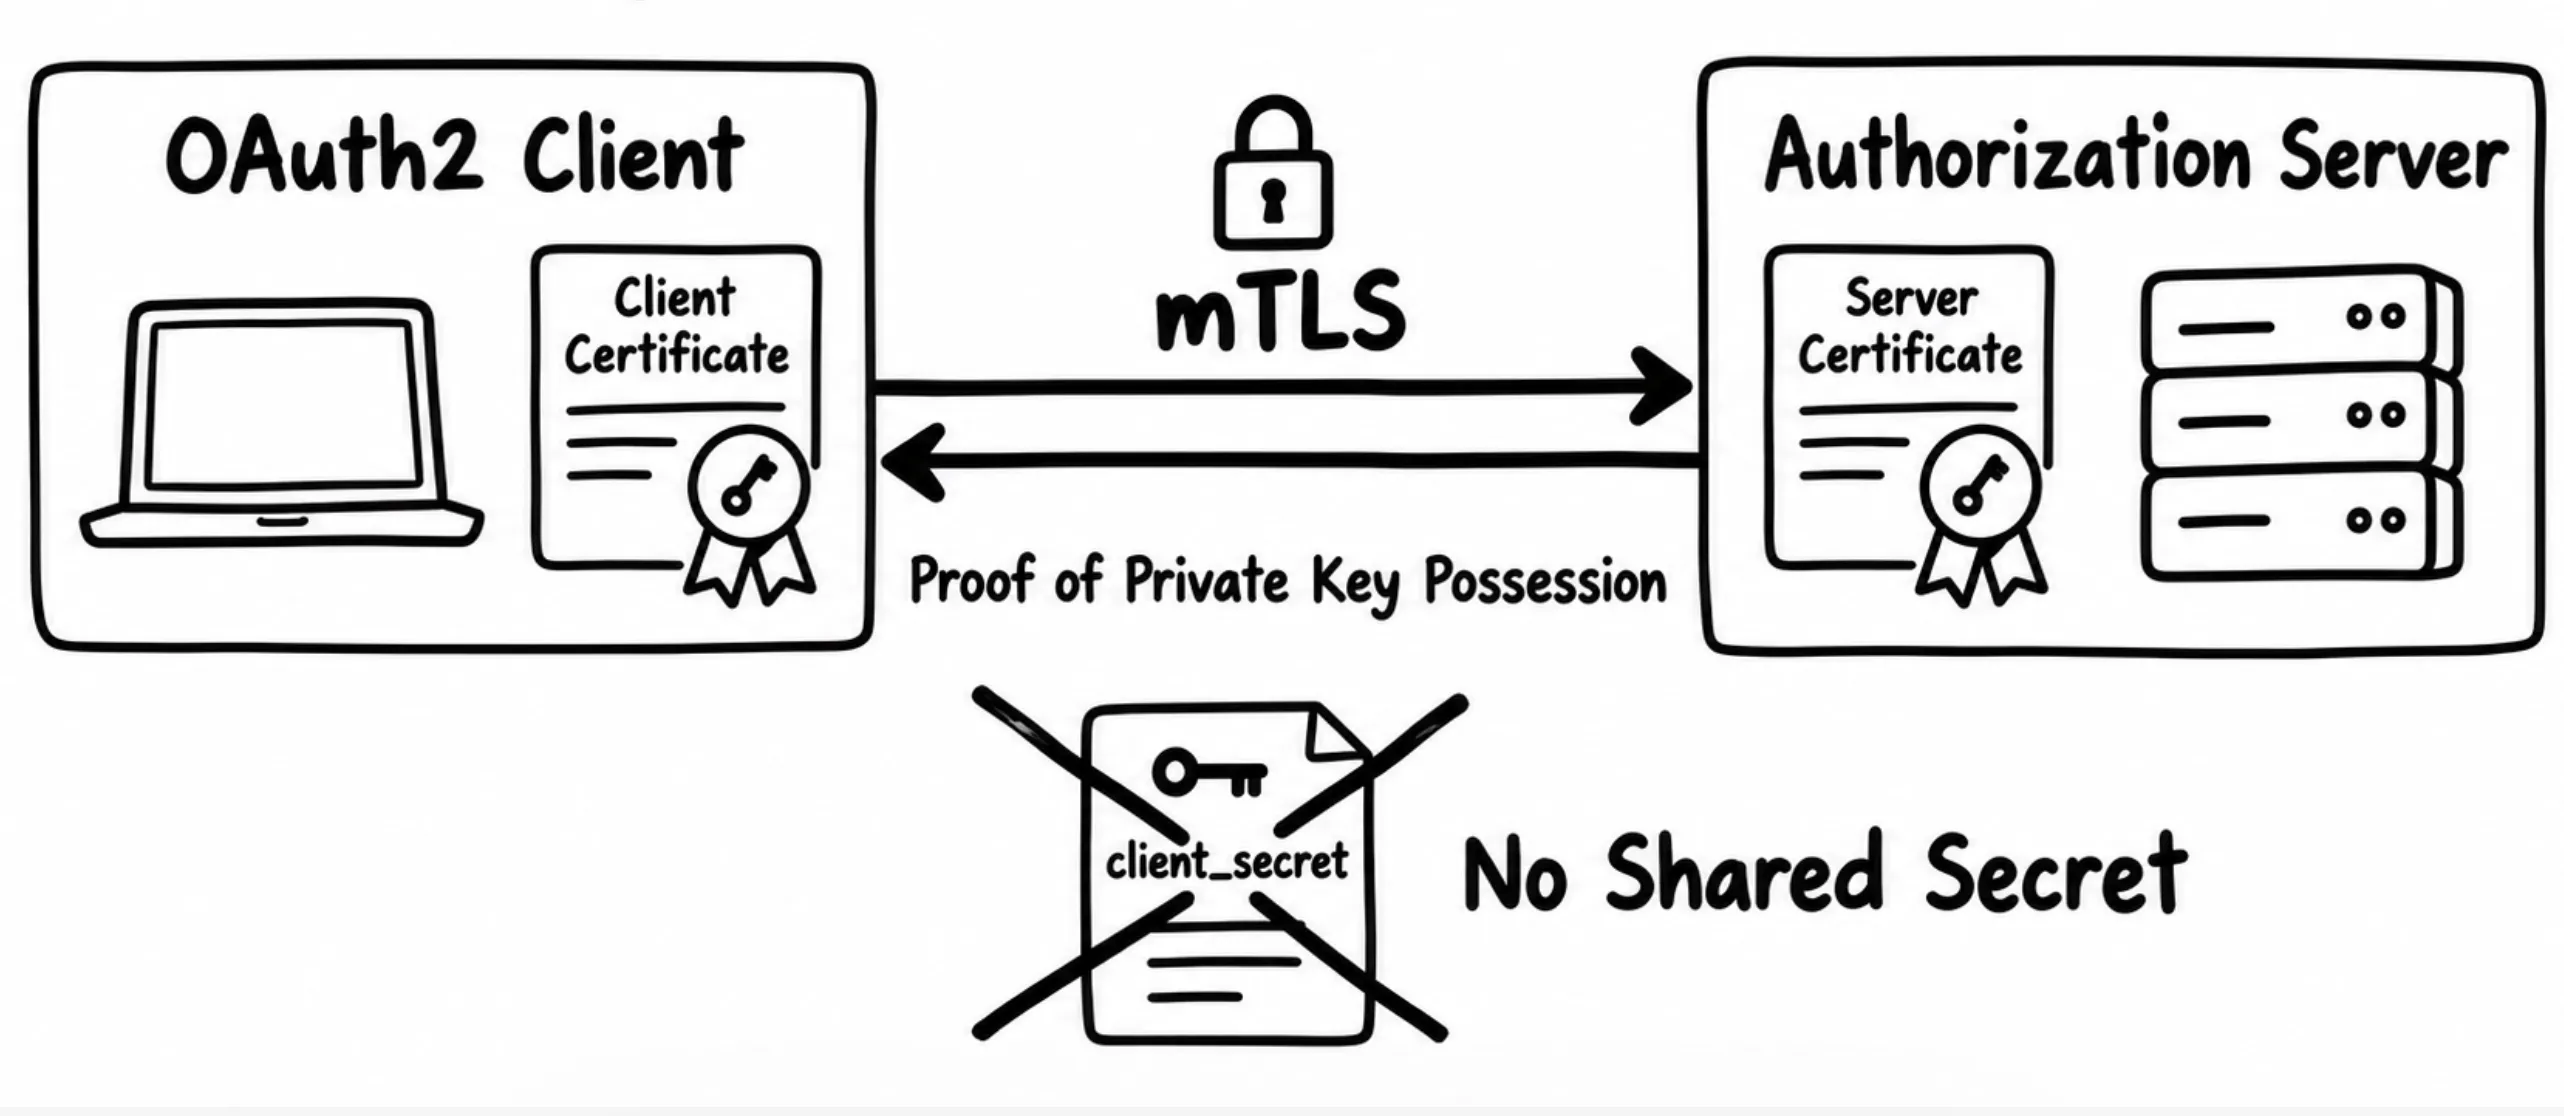
Most OAuth2 deployments authenticate clients using a client_secret which is a shared secret exchanged between the client and the authorization server at registration time. It works, and it’s simple to implement. But shared secrets have a fundamental weakness: they can be stolen, leaked, or brute-forced, and once compromised, there’s no way for the server to distinguish a legitimate client from an attacker holding the same secret.
There’s a stronger approach, one that’s been proven in system-to-system communication for over two decades, especially in regulated industries like finance and healthcare. It’s called mutual TLS, or mTLS, and it replaces shared secrets with cryptographic certificate-based authentication.
In this post, we’ll explore how mTLS authentication works at the TLS level, and how that same mechanism can be directly applied to satisfy the OAuth2 client authentication requirement giving you stronger security and better interoperability with systems where mTLS is already in use. This is the first part of a two-post series on Mutual-TLS Client Authentication and Certificate-Bound Access Tokens (RFC 8705). The second part covers certificate-bound access tokens.
Given the depth of this topic, I’ve broken it into three chapters.
Chapter 1: Handshake
X.509 certificates
Although we commonly call them “certificates,” the technically accurate term is X.509 certificates, named after the X.509 standard introduced by the International Telecommunication Union (ITU) as part of the X.500 directory services in 1988.
The diagram below shows a simplified view of a typical certificate, highlighting the key elements relevant to this discussion.
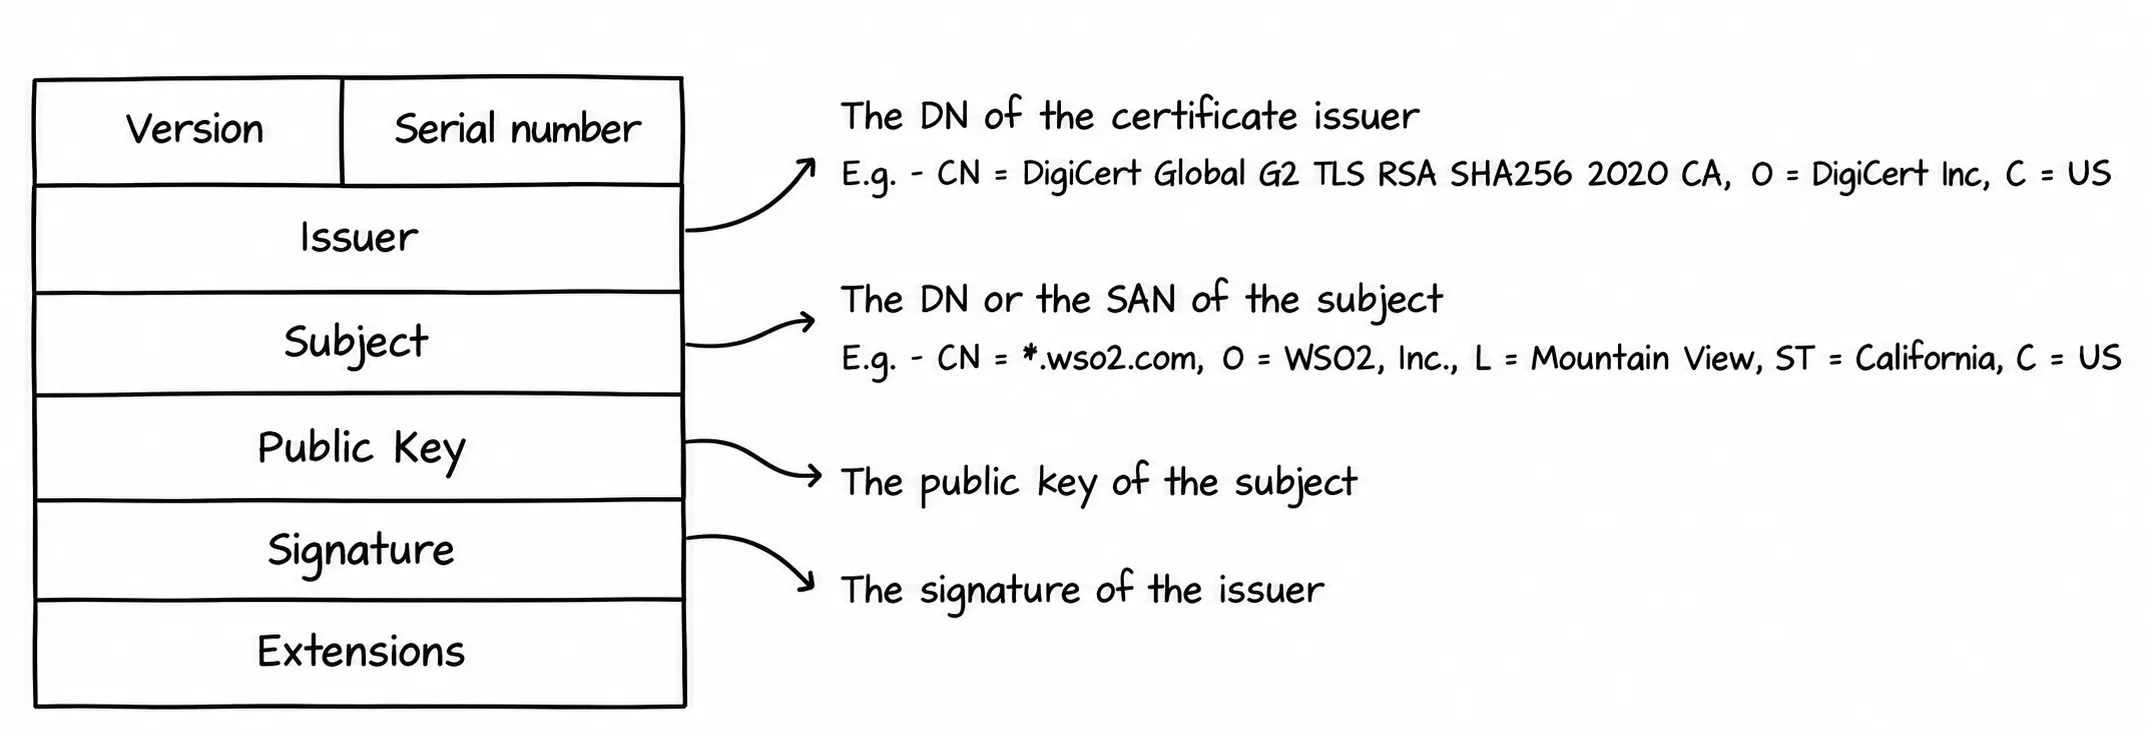
One important concept to understand upfront is the Distinguished Name (DN) — a string composed of attribute-value pairs that acts as a unique identifier for entities such as certificate authorities, servers, or applications within X.509 certificates.
For example:
CN = DigiCert Global G2 TLS RSA SHA256 2020 CA, O = DigiCert Inc, C = US
This DN is made up of three key attributes: CN (Common Name), O (Organization), and C (Country). Together, they form a unique identifier that can represent the issuer or subject in a certificate.
Let’s break down the key components:
-
🏷️ Issuer — identifies the entity that issued the certificate, represented as a Distinguished Name (DN) following the LDAP protocol.
CN = DigiCert Global G2 TLS RSA SHA256 2020 CA, O = DigiCert Inc, C = US CN = GTS CA 1C3, O = Google Trust Services LLC, C = US -
🧾 Subject — identifies the entity the certificate was issued to. Like the issuer, this is typically a DN or a Subject Alternative Name (SAN).
CN = *.wso2.com, O = WSO2, Inc, L = Mountain View, ST = California, C = US CN = *.google.com -
🔑 Public Key — the public key corresponding to the private key held by the subject. Used in the TLS handshake for encryption and key exchange.
-
🖋️ Signature — the certificate’s digital signature, created by the issuer using its private key. The certificate content is encoded, hashed, and that hash is signed ensuring both integrity and authenticity.
Most certificates you encounter in the wild are issued by a Certificate Authority (CA) as part of Public Key Infrastructure (PKI). But it’s also straightforward to generate self-signed certificates, particularly for internal use or server-to-server communication. The key difference: with self-signed certificates, the issuer and subject are the same entity.
🔎 Example 1 — PKI-issued certificate (from the WSO2 website):
- Issuer:
CN = DigiCert Global, O = DigiCert Inc, C = US - Subject:
CN = *.wso2.com, O = WSO2, Inc, L = Mountain View, ST = California, C = US
🔎 Example 2 — Self-signed certificate (from WSO2 Identity Server):
- Issuer:
CN = localhost, OU = WSO2, O = WSO2, L = Mountain View, ST = CA, C = US - Subject:
CN = localhost, OU = WSO2, O = WSO2, L = Mountain View, ST = CA, C = US
Certificate validation
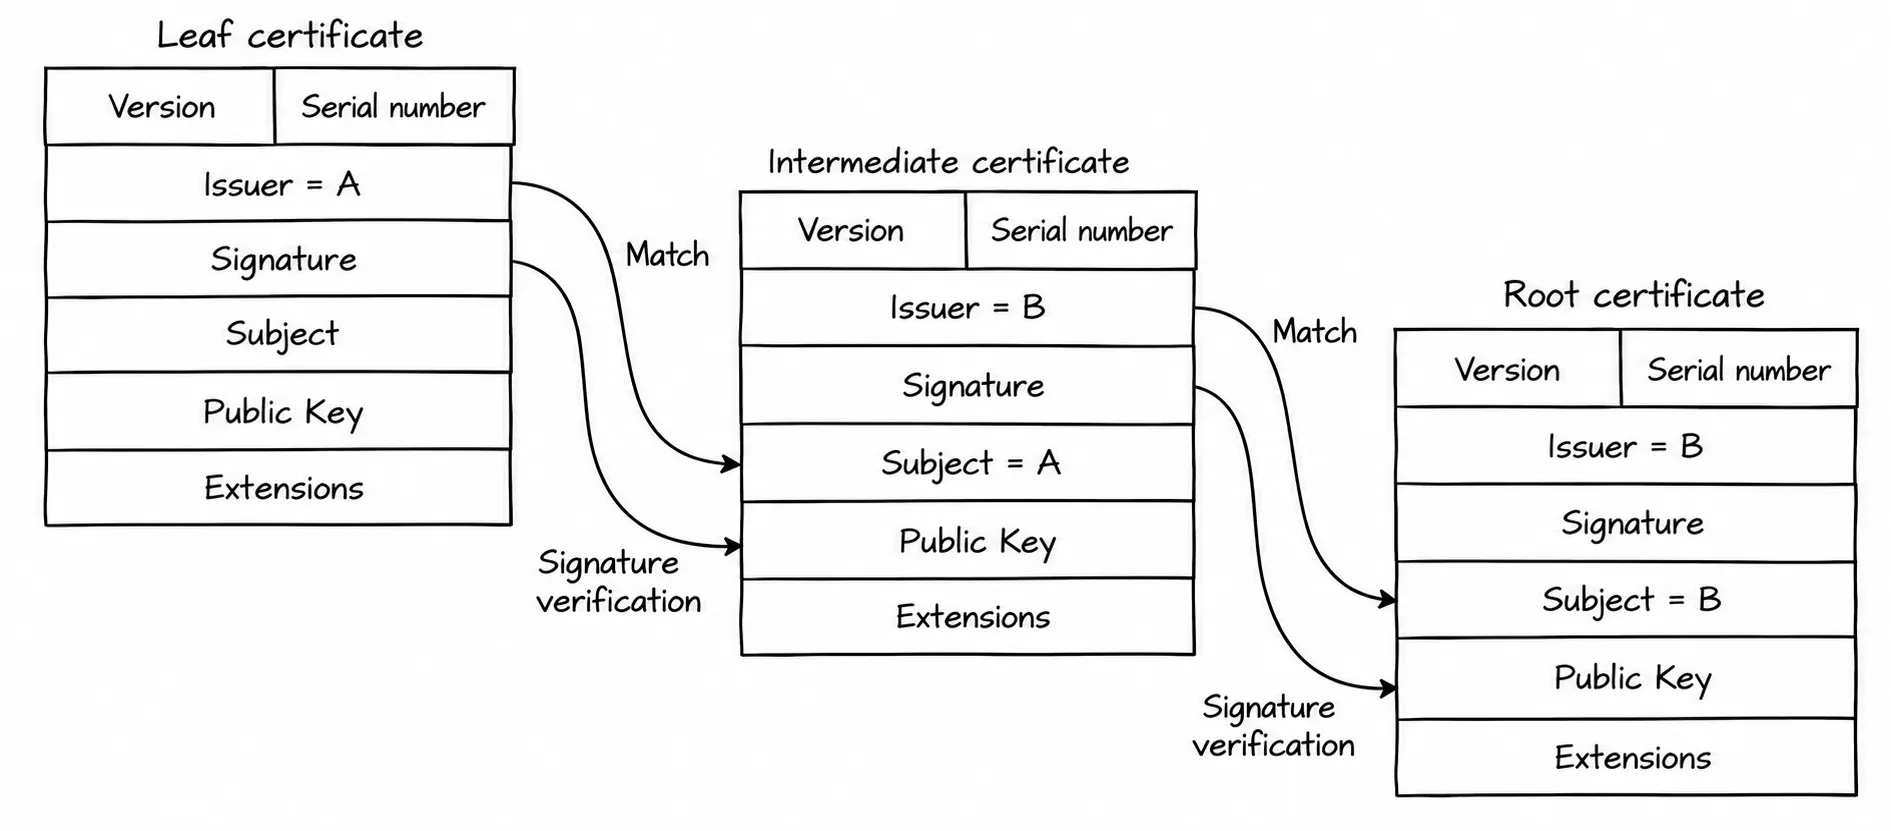
The approach to validating a certificate depends on whether it’s CA-issued or self-signed. For CA-issued certificates, the process is certificate chain validation. The certificate’s signature is verified using the issuer’s public key, and the issuer’s DN in the current certificate is checked against the subject’s DN in the next certificate in the chain. Validation starts at the leaf certificate and works up through intermediate certificates to the root certificate, which provides the trust anchor for the entire chain. Root certificates come from a small number of highly trusted CAs recognized by browsers and operating systems.
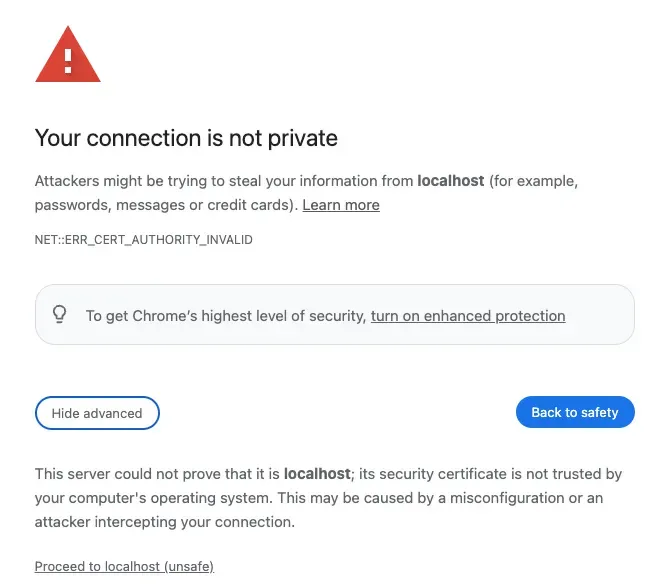
For self-signed certificates, there’s no universal validation method, the approach depends on the use case. Web browsers warn users when they encounter a self-signed certificate and may allow manual inspection and acceptance. Tools like cURL offer --insecure (-k) to bypass verification, though this should be used with care.
Non-browser applications, such as those involved in system-to-system communication, can explicitly trust a self-signed certificate by presenting a copy of it before initiating communication, either by directly uploading the certificate in PEM or another format, or by providing a URL where the certificate content can be retrieved. In OAuth 2.0 and OpenID Connect, the JWKS endpoint is commonly used for this purpose, exposing an entity’s public keys through a network-accessible URL.
Certificate fingerprints
Before moving to the handshake, one more concept worth covering: the certificate fingerprint (or thumbprint). If you’ve ever viewed a certificate in a browser, you’ve likely seen this small string. Importantly, it’s not part of the certificate itself, and calculated externally and used to uniquely reference a certificate. The calculation process:
- If the certificate is in PEM format (Base64-encoded ASCII), convert it to DER format (binary encoding).
- Apply a hash function such as SHA-256 to the DER binary data.
- Format the resulting hash into a human-readable fingerprint.
This fingerprint concept becomes central in the second part of this series when we cover certificate-bound tokens.
TLS and mTLS handshakes
The first step in establishing a secure, encrypted channel between two entities is the TLS handshake. Let’s break it down into two roles: the client (the entity initiating communication to obtain a service) and the server (the entity listening on a network port to provide it).
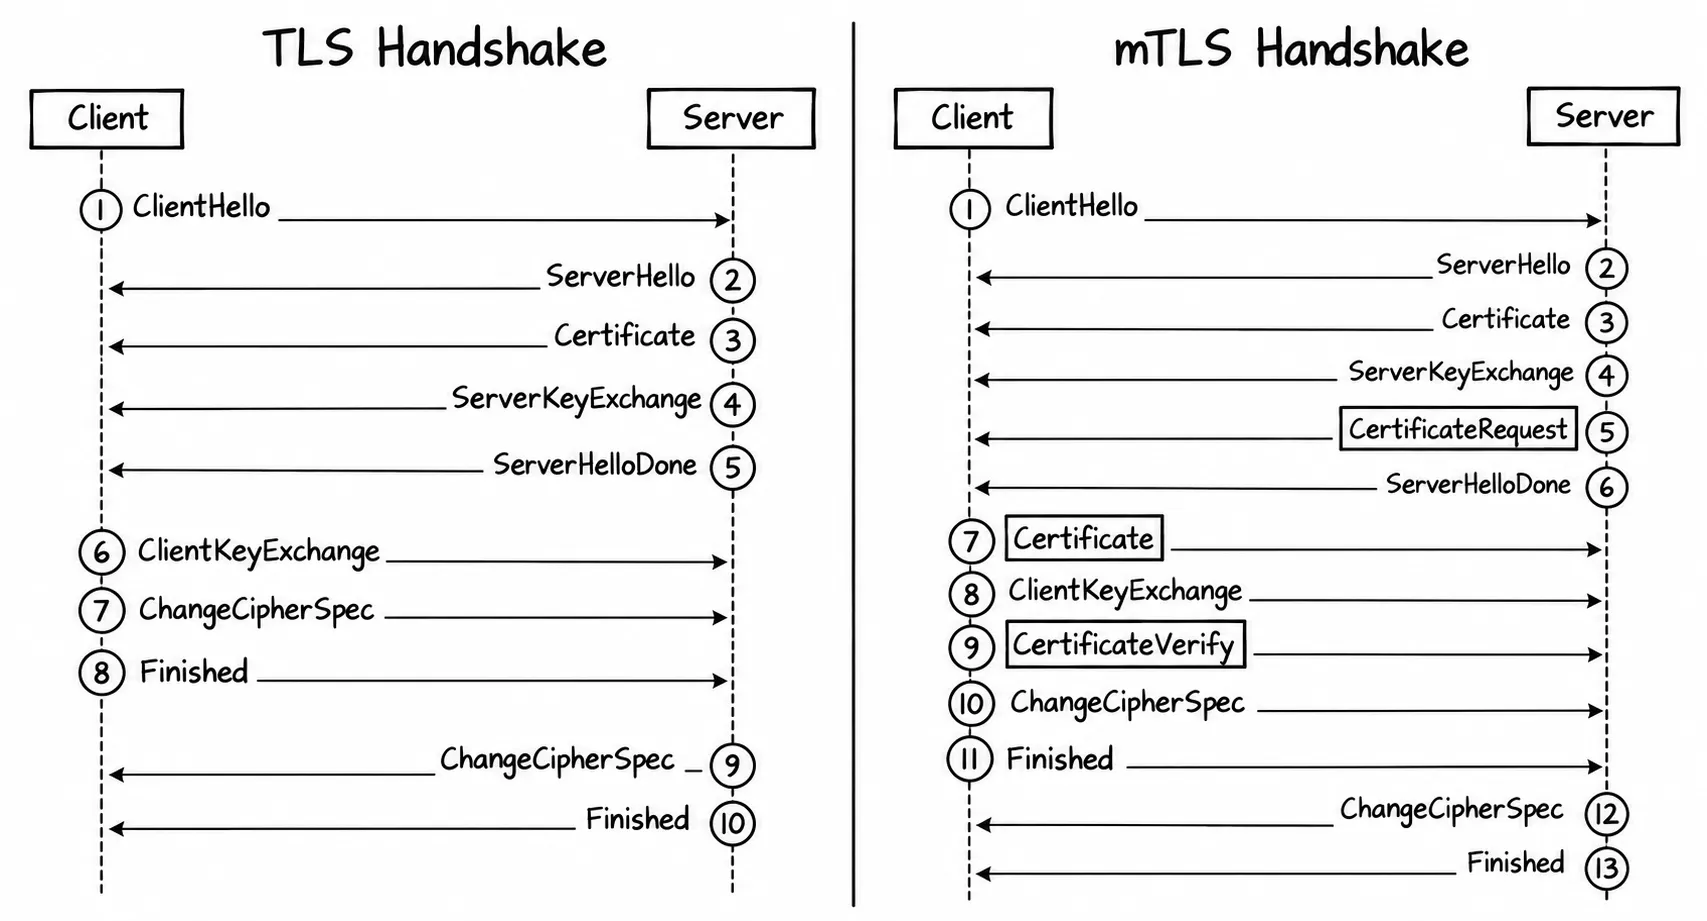
In a standard TLS handshake, the server sends its certificate to the client in step 3 using the Certificate message. The client validates the server’s certificate and confirms the server’s identity, this is one-way verification.
mTLS adds a second layer. In step 5, after the client has verified the server’s certificate, the server sends a CertificateRequest message asking the client to present its own certificate. The client responds with its certificate, and the server validates it using the same methods discussed earlier. After step 7, the server has authenticated the client, and the client’s identity is now established.
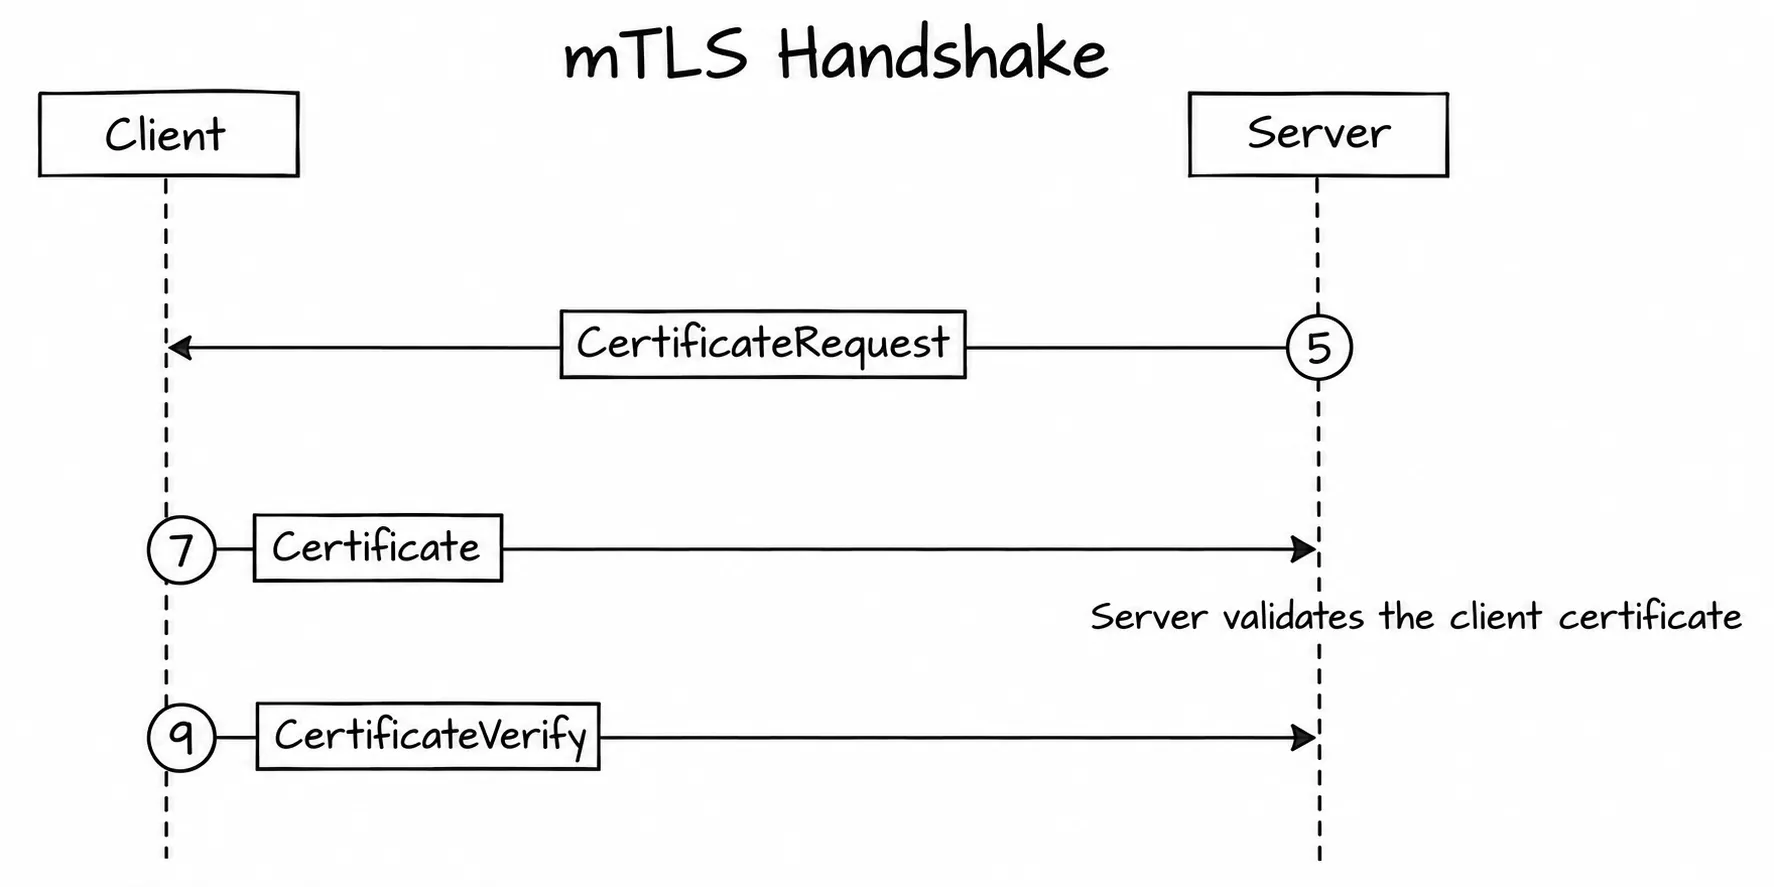
In short: TLS authenticates the server. mTLS authenticates both parties.
One additional message in the mTLS flow deserves attention: the CertificateVerify message sent in step 9. Its purpose is to prove that the client actually possesses the private key corresponding to the certificate it presented, not just a copy of someone else’s certificate. The process:
- Collect all handshake messages exchanged between client and server up to this point.
- Apply SHA-256 to those messages to generate a hash value.
- Sign the hash using the client’s private key, this signed value becomes the CertificateVerify message.
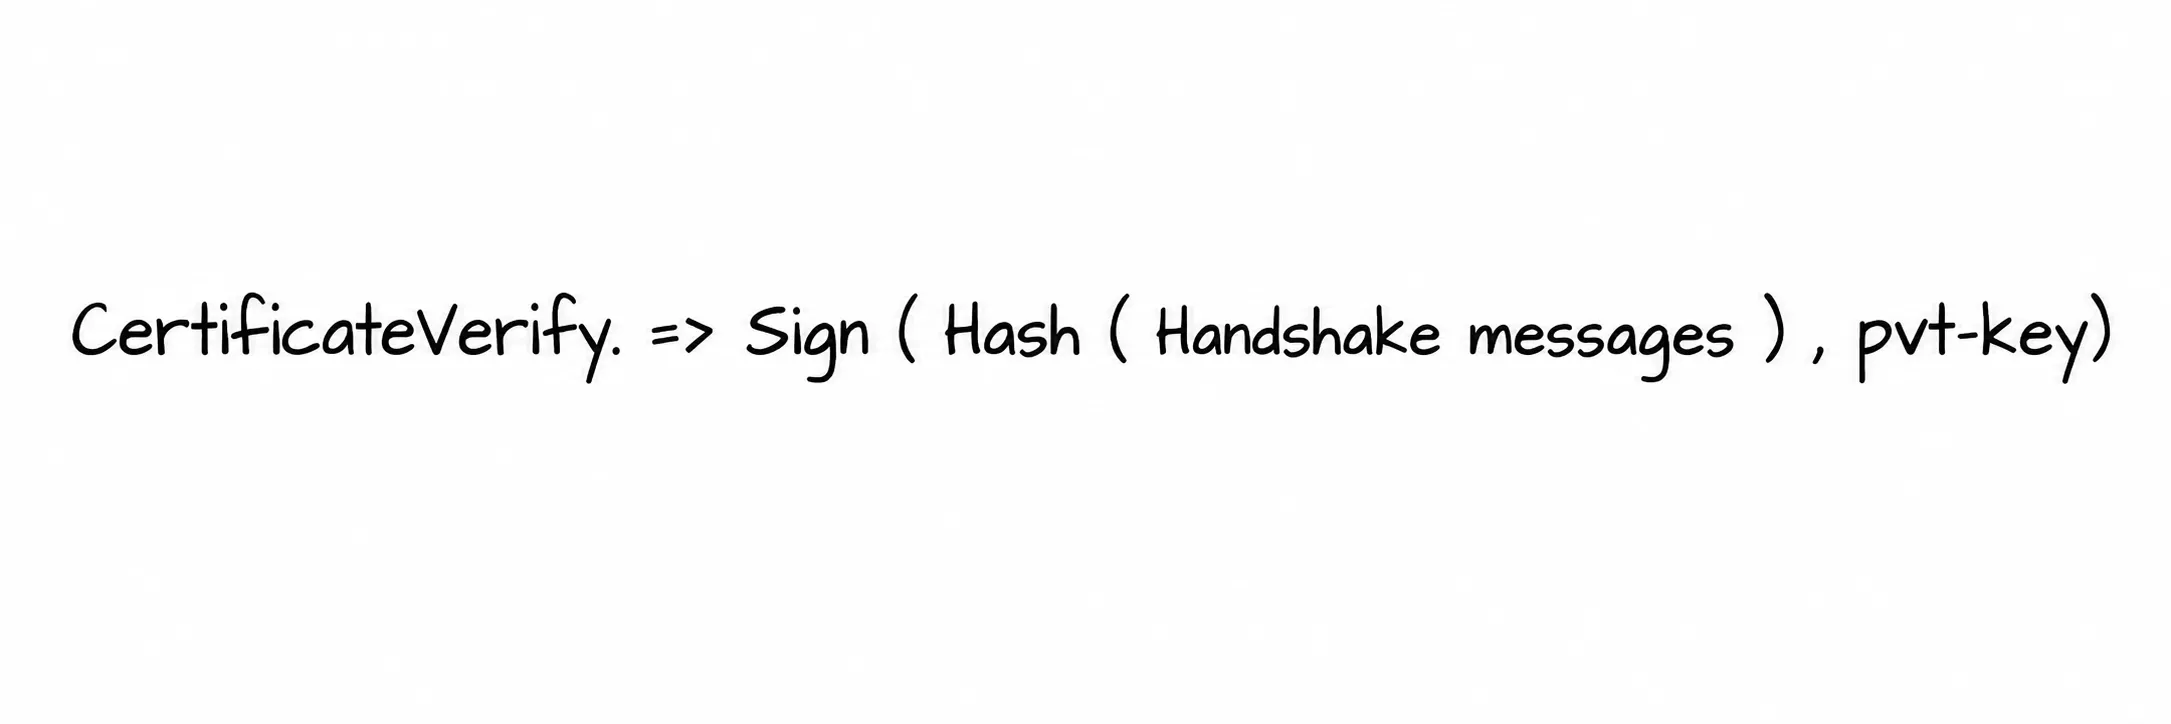
When the server receives this message, it uses the client’s public key (from the client’s certificate) to verify the signature. If the signature is valid, the server confirms the client holds the correct private key. This proof-of-possession mechanism is exactly what we’ll build on in the certificate-bound tokens post.
Chapter 2: OAuth2 client authentication
In OAuth2, a client is an entity that obtains an access token from an authorization server on behalf of an end user. Clients fall into two categories:
- Confidential clients — such as server-side web applications that can securely store and manage credentials.
- Public clients — such as browser-based or mobile applications that cannot securely store and manage credentials.
The OAuth2 specification requires authorization servers to authenticate confidential clients before issuing tokens. The spec defines client authentication as an abstract requirement, giving implementers flexibility in how they meet it, but it also defines one concrete method: a shared secret called client_secret.
During client registration, the client and authorization server agree on the client_secret value. When the client makes a token request, it authenticates by providing this secret, most commonly via the HTTP Authorization header.
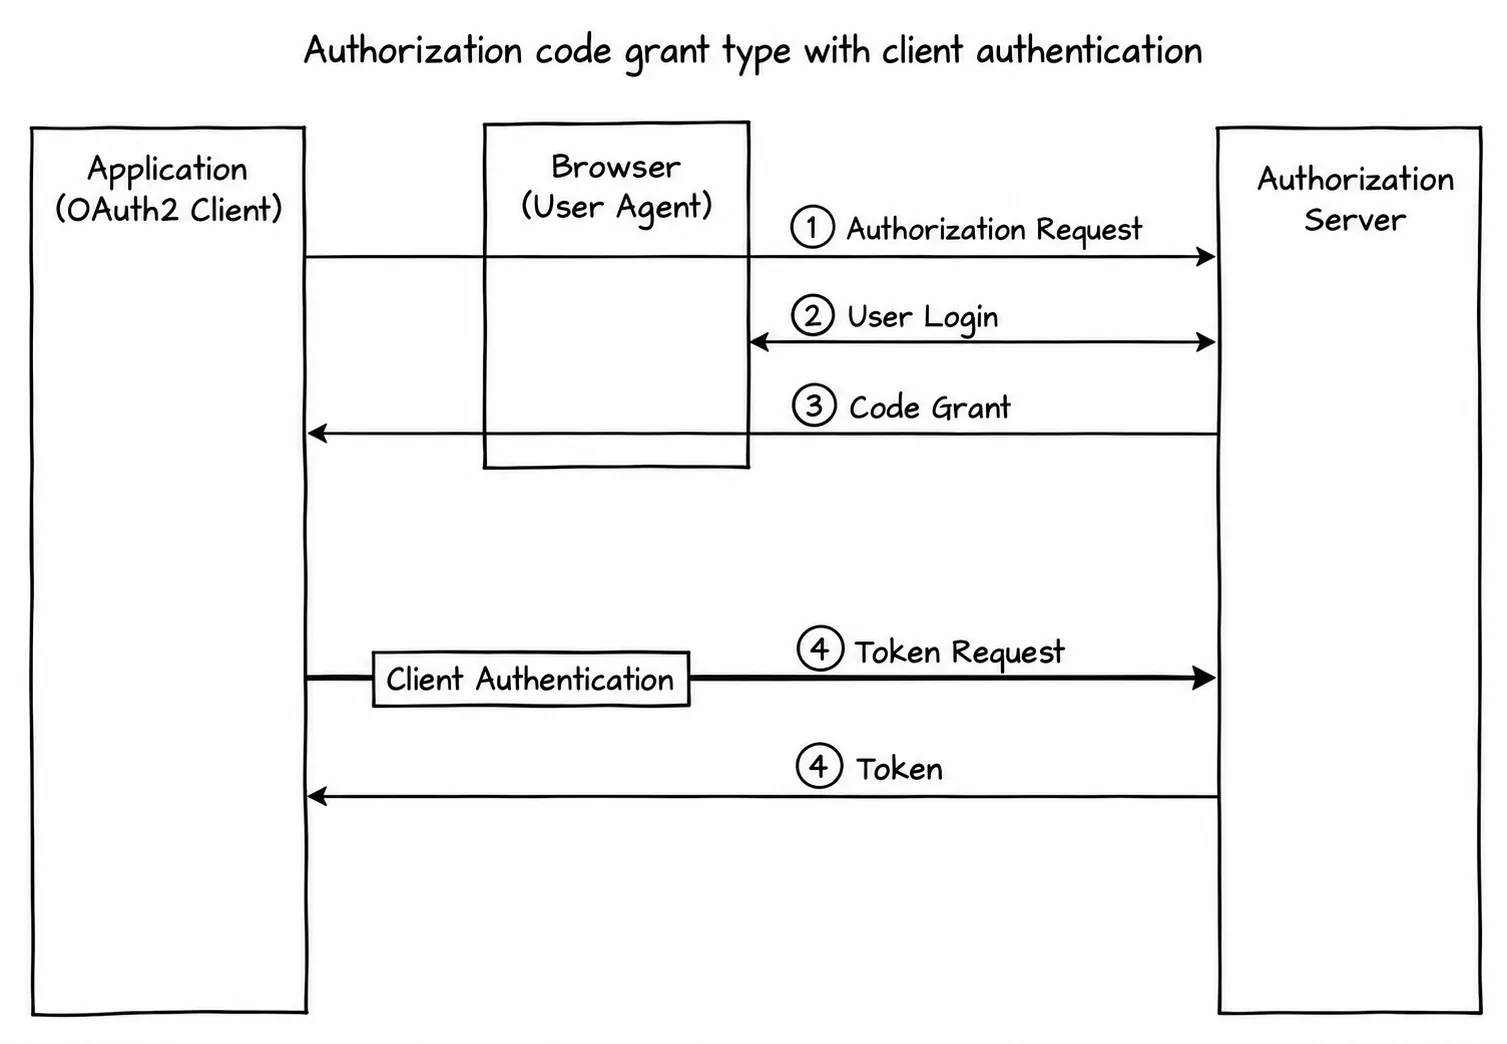
Despite its widespread adoption, shared secret authentication has limitations. Secrets can be leaked through logs, intercepted in transit, or exposed in code repositories. For use cases requiring higher assurance, particularly in system-to-system communication in regulated environments.
Chapter 3: mTLS for OAuth2 client authentication
Here’s where the two threads come together.
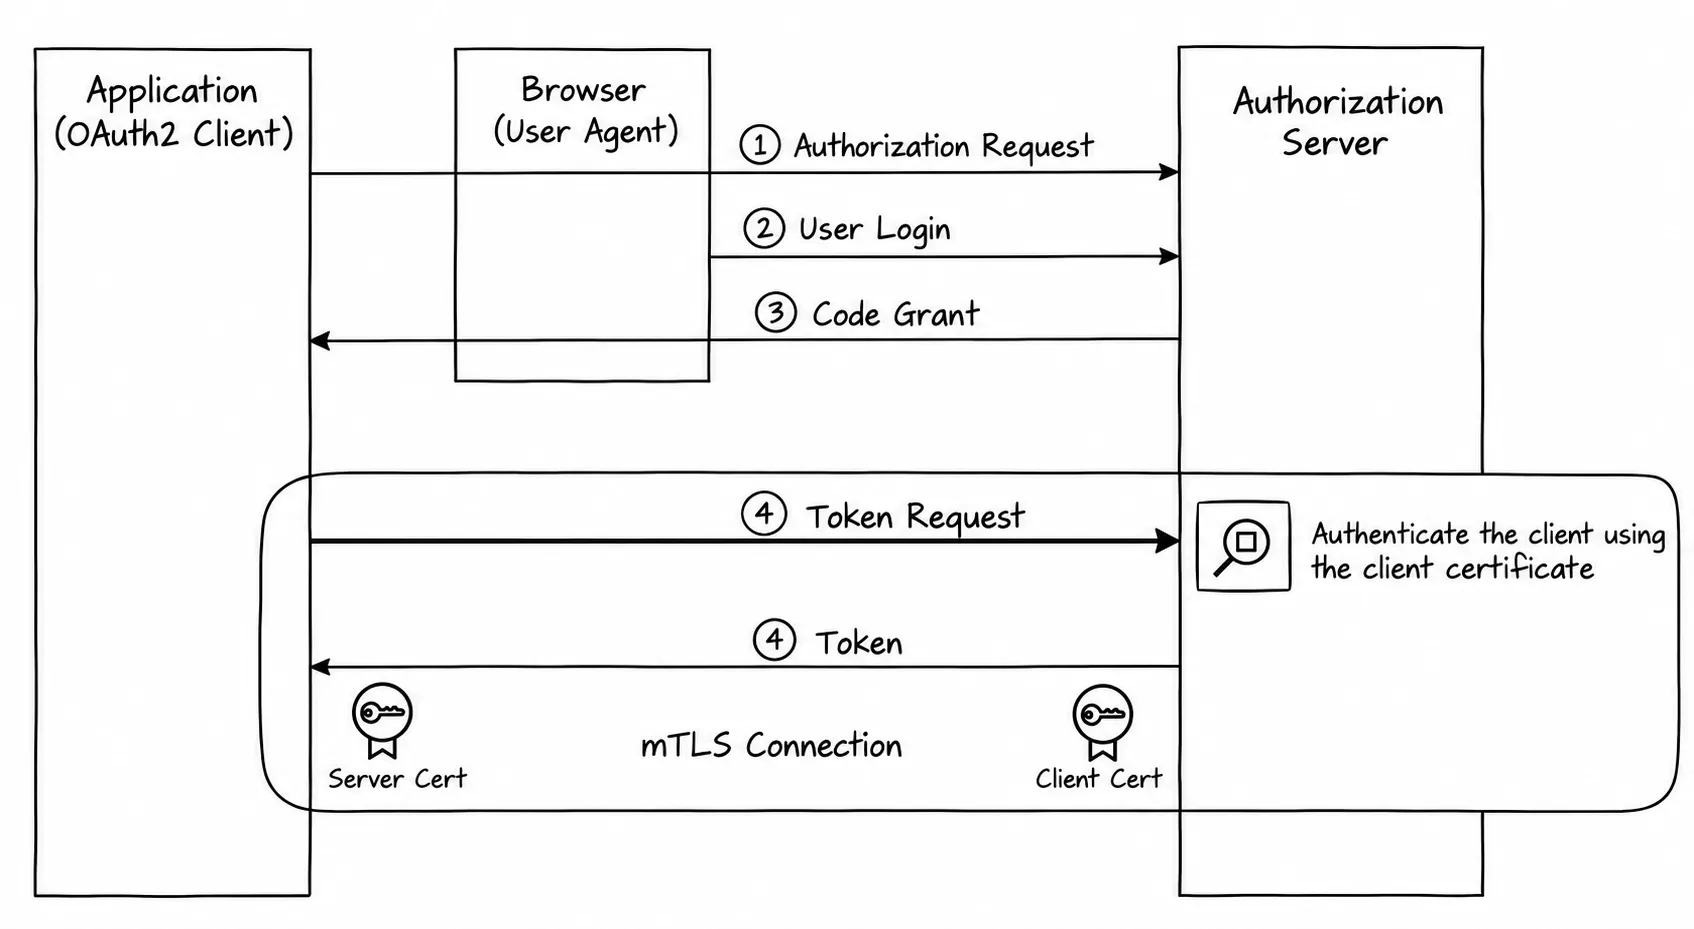
When an OAuth2 client communicates with an authorization server, it should use HTTP over TLS, the OAuth2 client acts as the TLS client, and the authorization server acts as the TLS server. When mTLS is used, the client has already been authenticated during the handshake via its certificate at the TLS layer.
The question is: can we use that authentication, already established at the TLS level, to satisfy the OAuth2 client authentication requirement?
The answer is yes, and that’s exactly what the first part of R Mutual-TLS Client Authentication and Certificate-Bound Access Tokens (RFC 8705) addresses. mTLS-based OAuth2 client authentication is more secure than shared secret authentication because it relies on asymmetric cryptography and proof of private key possession, rather than a reusable secret that can be stolen.
PKI certificate-based authentication
When a PKI certificate is used in the mTLS handshake, the authorization server has already verified the certificate through certificate chain validation. It can then compare the subject of that certificate against the subject information registered by the OAuth2 client during registration.
Just as a client registers its name and redirect URI during client registration, it can also register its Distinguished Name (DN) or Subject Alternative Name (SAN). The authorization server uses this registered value to authenticate the client by matching it against the subject in the presented certificate. One subject value should map to exactly one OAuth2 client.
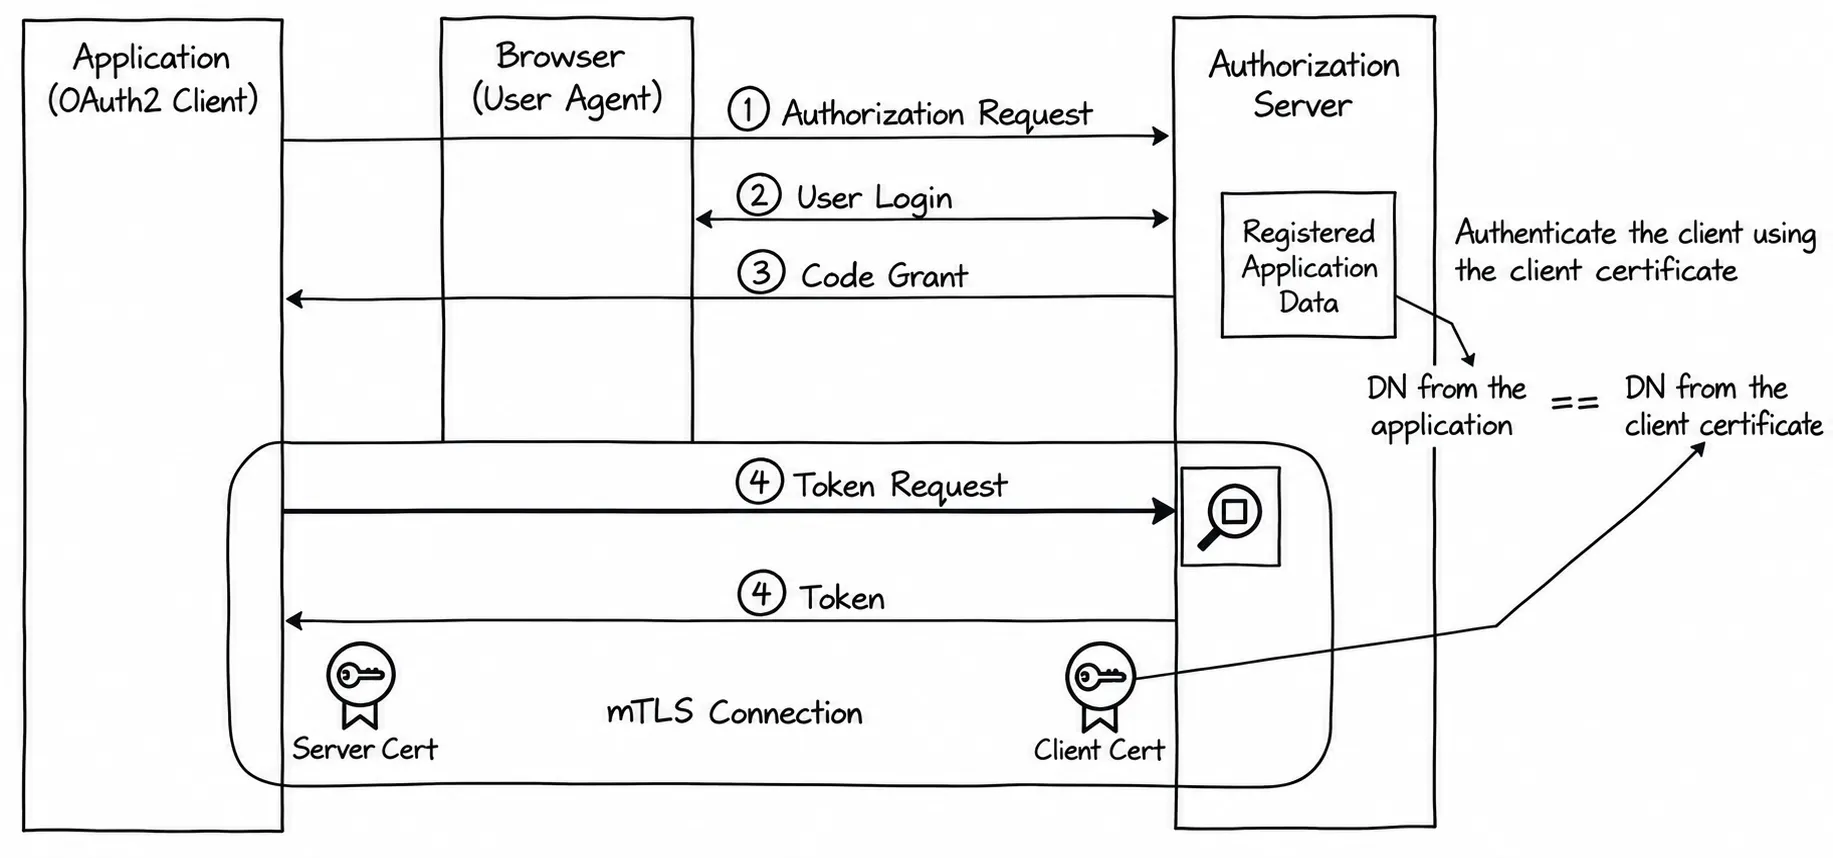
A key advantage of PKI certificates is that clients can rotate certificates freely, as long as the new certificate carries the same subject value. Authorization servers may optionally check certificate revocation status as well.
Here is a sample token request using mTLS client authentication:
curl --location --request POST 'https://localhost:9443/oauth2/token' \
  --header 'Content-Type: application/x-www-form-urlencoded' \
  --data-urlencode 'code=be728f21-8b3b-3c90-98e3-66188a647407' \
  --data-urlencode 'grant_type=authorization_code' \
  --data-urlencode 'client_id=QGR5np4F_OYGSH8L5F3klJJPrUEa' \
  --data-urlencode 'redirect_uri=https://myapp/login'
An authorization server advertises support for PKI certificate-based mTLS authentication by including tls_client_auth in its server metadata.
RFC 8705 defines the following registration parameters for specifying the subject identity the authorization server should match against during authentication:
-
tls_client_auth_subject_dn— matches the full Subject DN of the client certificate. Use this when the client is identified by its full Distinguished Name. -
tls_client_auth_san_dns— matches a DNS SAN entry in the client certificate. Useful for matching domain names tied to the client identity. -
tls_client_auth_san_uri— matches a URI SAN entry. Often used when the client is identified by a service URL. -
tls_client_auth_san_ip— matches an IP address SAN entry. Common in internal network setups where services are identified by IP. -
tls_client_auth_san_email— matches an email address SAN entry. Useful when the client identity is tied to an email address.
Self-signed certificate-based authentication
When self-signed certificates are used, the authorization server can allow the OAuth2 client to upload its certificate directly in PEM or JWKS format, or provide a JWKS endpoint URL during registration. When the client initiates a token request over mTLS, the authorization server matches the certificate from the mTLS connection against the registered certificate details.
If the full certificate is registered directly, the authorization server compares it against the mTLS client certificate. If a JWKS endpoint URL is registered instead, the server fetches the certificate from that endpoint for comparison.
One practical consideration: if the certificate is uploaded directly, any rotation requires updating the registration in the authorization server. If registered as a JWKS endpoint URL reference, certificate rotation can happen transparently without any changes to the client registration.
An authorization server advertises support for self-signed certificate mTLS authentication by including self_signed_tls_client_auth in its server metadata. RFC 8705 uses the existing jwks and jwks_uri DCR parameters for certificate registration, and no new registration parameters are introduced for the self-signed case.
Deployment considerations
Mutual-TLS Client Authentication and Certificate-Bound Access Tokens (RFC 8705) doesn’t prescribe a deployment architecture, but there are two scenarios you’ll encounter in practice, and the second one has a challenge worth understanding.
Scenario 1: Direct mTLS connection
The OAuth2 client establishes a direct mTLS connection to the authorization server. This is straightforward, especially with Identity-as-a-Service (IDaaS) providers, and relies on pre-configured TLS settings on both ends.
Scenario 2: mTLS terminated at a reverse proxy
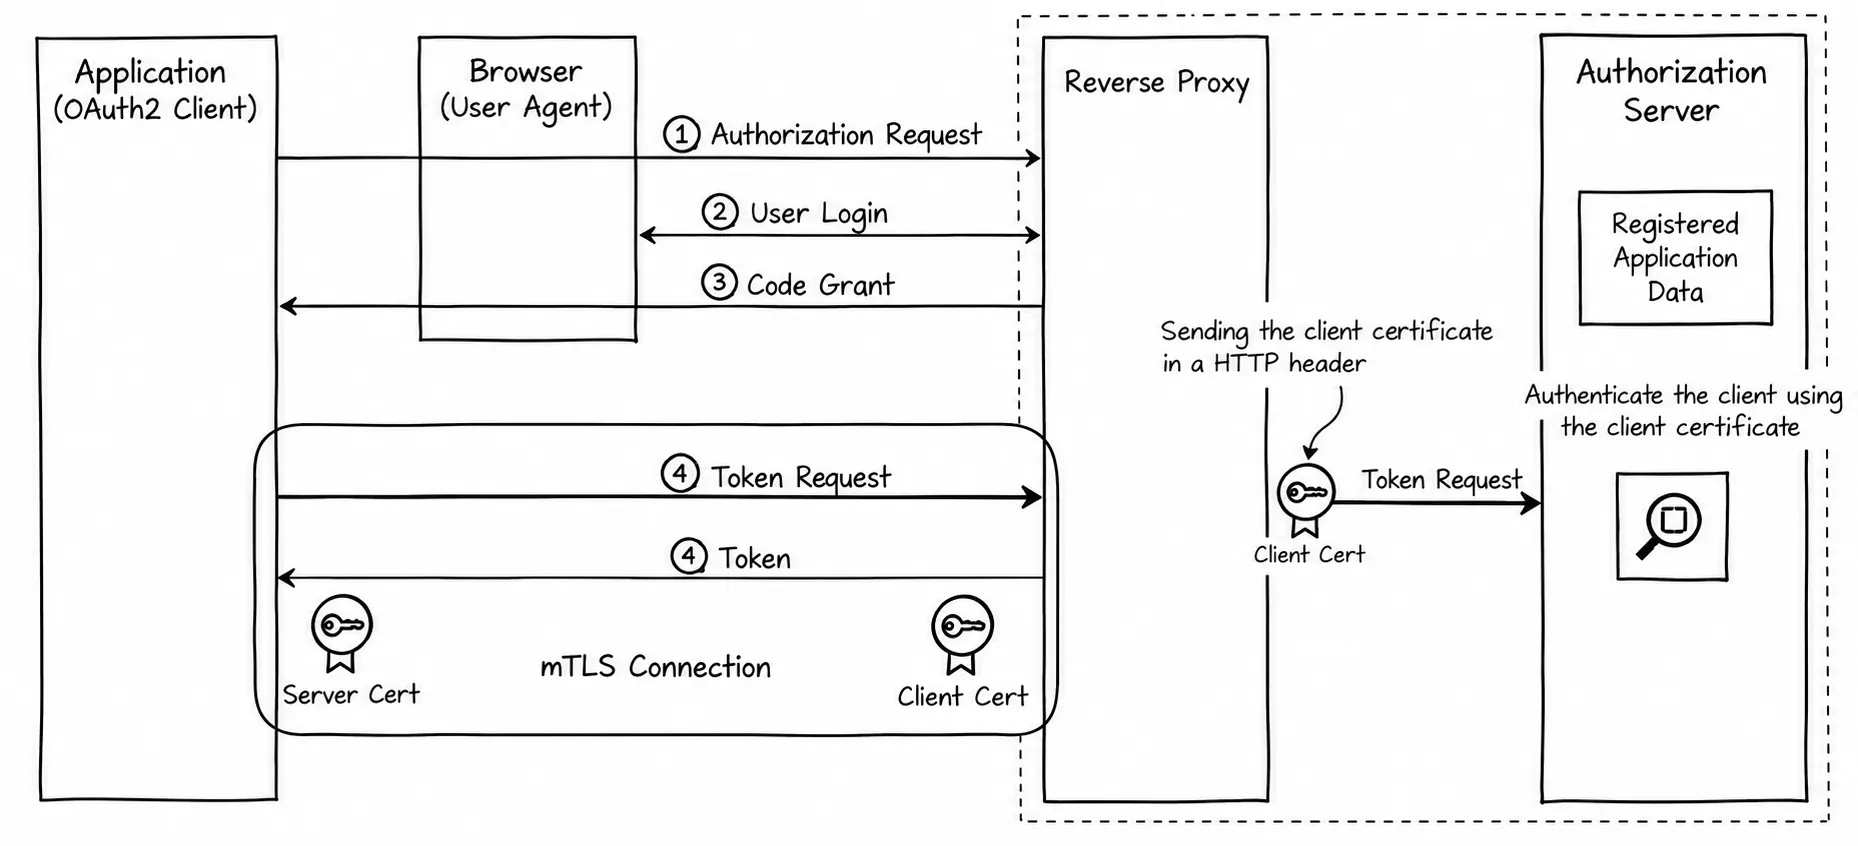
This is the more common pattern in on-premise authorization server deployments. A reverse proxy (such as Nginx) handles the mTLS handshake and terminates the mTLS connection. Only clients that successfully complete the mTLS handshake can reach the authorization server behind it. The reverse proxy typically sits in a DMZ zone while the authorization server is in a restricted zone, but both are within the same trust domain. The reverse proxy can logically be considered an internal component of the authorization server deployment.
The challenge here: the authorization server never participates in the mTLS handshake directly, so it doesn’t have native access to the client certificate.
The solution that has become common across IAM vendors is simple and practical: after terminating the mTLS connection, the reverse proxy forwards the client certificate to the authorization server as an HTTP header. Most modern reverse proxies support this natively. The specific header name isn’t standardized, for example, WSO2 Identity Server defaults to x-wso2-mtls-cert, which is configurable. The authorization server reads this header and treats it as the authenticated client certificate.
Where this leads
In this post, we covered how authentication works in the mTLS protocol and how that same mechanism can be applied directly to OAuth2 client authentication giving you a more secure and more interoperable alternative to shared secrets.
In Part 2, we go further: exploring how the client certificate used in mTLS can be used to bind the access token itself to the presenting client, making it useless to anyone who intercepts or steals it. That’s the certificate-bound tokens story.
Certificate-Bound Access Tokens: How mTLS Makes Stolen Tokens Useless Certificate-bound tokens bind the access token to the client certificate used in the mTLS handshake, so even if a token is intercepted, it's worthless.